

 Recently, I have been configuring Avahi on my laptop and desktop computers and I wanted to evaluate its possibilities. The first obvious choice was using Rhythmbox to share music within the two computers. But that was too easy, basically once Avahi was configured, I had nothing else to do, it just worked…
Thus, I wanted another challenge and I was remembering that Gaim (now Pidgin) should support the Bonjour protocol. Bonjour is an implementation of Zeroconf made by Apple and release as open source. Avahi is another implementation of Zeroconf and is readily installed on Ubuntu by default, though not activated. However, the installed Gaim on Ubuntu 7.04 cannot create a Bonjour account. That was just the excuse I needed to take some times getting Pidgin and installing it.
The installation will describes how to install Pidgin with support for Bonjour and Avahi on Ubuntu 7.04, and I will try to keep it the easiest possible. However, you will have to use the command line. No worries, though, as I will try to make it easy!  A second little chapter will explain how to activate Avahi. This guide has been validated on both the 32bit and 64bit versions of Ubuntu.
Pidgin installation on Ubuntu 7.04
The first thing to do is to install the development libraries required to compile Pidgin. For the record, Ubuntu 7.04 is shipped with Gaim 2.0.0beta6. Just after Ubuntu was available, the Gaim project was renamed Pidgin and was released. The current version is now Pidgin 2.0.2. So the release shipped with Ubuntu and the current release are almost equal. Therefore, we will be using the list of dependencies that the Ubuntu developers used for Gaim.
Open a Terminal: you will find this application under the “Applications” main menu -> “Accessories” -> “Terminal”. Once open, just type in:
sudo apt-get build-dep gaim
The first command, sudo, is used to gain administrative privileges. A password will be requested, enter the password you are using to login. The rest of the command tells Ubuntu to get the building dependencies for Gaim. Wait for it to complete.
Now, launch Synaptic, which you will find in the “System” main menu -> “Administration” -> “Synaptic package manager”, and install the following packages:
- build-essential: this package is required to build the application (it might already be installed)
- libavahi-compat-howl-dev: this package is optional. It is only necessary if you want to use the Bonjour protocol with Pidgin.
If you do not know how to search for a package and install it in Synaptic, there is a small guide about Synaptic in the Ubuntu documentation.
Now, we will create one new directory. It is a temporary one , which we will call build as we will use it to build Pidgin. Under the “Places” main menu select “Home Folder”. Nautilus (your file manager) will display the list of files and directories in your home folder. In the “File” menu of Nautilus, choose “Create folder”. A new directory appears and you can change its name: choose build.
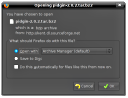 Now let us download Pidgin. Go to the Pidgin web page where you can download the source code. Click on the available download link and wait a few seconds. Firefox should display you a dialog box like the one displayed on the right. Make sure that you select “Open with” and that the application is “Archive manager”, then press “OK”.
Depending on your download speed, you might wait several minutes before the download finished and Firefox launches the Archive manager. Once it is open, just click “Extract” in the Archive manager. A dialog box will appear. In this dialog box, you should see the build directory, double click on it and then press the “Extract” button in the bottom-right corner.
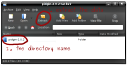
You can switch back to the Terminal application and enter the following commands. Note, that the first command might be different, depending of which version of Pidgin you just downloaded. If you still have the Archive manager opened, check the directory name (see figure below) and replace “pidgin-2.0.2” below by what you have.
cd build/pidgin-2.0.2
./configure --enable-nm --enable-dbus --prefix=/usr/local/
make
sudo make install
Pidgin is now installed on your system, that was it. Now, we will create an entry in your application menu so you do not have to use the Terminal anymore
Adding Pidgin to the Internet Gnome menu (optional)
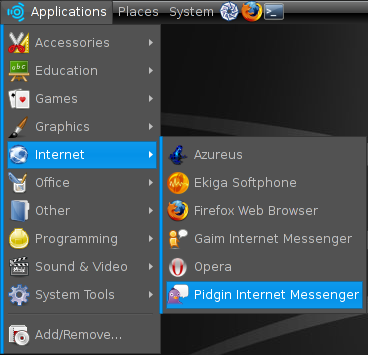
As mentioned, you can add Pidgin icon in the Internet menu. If you have followed exactly the above instructions, you should not need it. But in case you go to “Application” -> “Internet” and you do not find an entry with a pretty Pidgin called “Pidgin Internet Messenger”, try the rest of this section. In the other case, go to next section.
Under “System” main menu -> “Preferences” -> “Main menu”, a window will appear in which you should select the category Internet in the left pane and click on the “New item” button. In the new dialog, two parameters are important: the name and the command. For the name enter “Pidgin Internet Messenger” (or what is to your liking). For the command, you can either type in “/usr/local/bin/pidgin” (without the double quotes) or use the browse button. In the later case, you will have an extra dialog in which you select by double-clicking “File System” in the left pane, and then in the right pane you double click successively on usr, local, bin and finally pidgin.
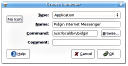 For a bit of eye candy and fun, you can set an icon to Pidgin. In the above dialog, there is a button “No icon”. Click on it. A small dialog with lots of icons will appear. However, Pidgin official icons is not in this list. In the above field there is the following text “/usr/share/pixmaps”. Just replace it by (you can copy and paste it, but without the double quotes) “/usr/local/share/icons/hicolor/scalable/apps”. You should see a nice pidgin icon select it and press “OK”. Press again “OK” in the following dialog, and “Close” to close the Main menu manager.
Launching Pidgin
You can now simply launch Pidgin like any other applications:
Pidgin with Avahi
Using Pidgin with Avahi can be fun at home  and it is pretty easy to set up. First, activate Avahi on Ubuntu.
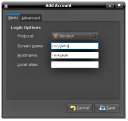 Now that you have Pidgin installed, open it. In the Pidgin menu named “Accounts”, select “Add/edit”. Create a new account, select Bonjour for the protocol and set a screen name, which will be your nickname on the local network.
Avahi is amazingly easy to set, in application that support it!
Now test it. If someone else uses the same protocol on your local network, you will be able to chat with him or her. You can test it with a friend who is using Pidgin too with Bonjour, just invite him on your local network. Or if you know someone who has a Mac, try it with iChat or Adium.
Update: it is also working with the Windows version of Pidgin. You will have to install the Bonjour implementation for Windows before you can create a Bonjour account. Also, the Windows firewall might issue a warning once you create the account, just accept to maintain the service open.
If you want to use Google Talk with Pidgin it is possible and really easy to set-up.
Google has some instructions to configure Pidgin, however not complete. So follow first their instructions until step 4 included.
Then before going into step 5, select the Advanced tab and in the “Connect server” field write the following: talk.google.com. Leave the rest as is and go on with Google instructions.
You will be connected to Google Talk in a matter of seconds