On my laptop, I’m running Fedora 22 which was shipped initially with a Linux 4.0 kernel. It was difficult to get 4h of battery life (3h30 was usually enough to deplete the battery down to 5%). Recently, the kernel was changed to 4.1 and because after 5h working on my laptop I got notified that I still had 10% power I got curious,
Therefore with a fully charged battery, I booted with Fedora 22 Linux kernel 4.0.4-301. I used powertop to measure the battery power usage in Watt in graphical (ex-init 5 level) and multi-user target (ex-init 3 level). I then rebooted using Linux kernel 4.1.3-201 and did the same measurement. I waited each time that the system settled down and that successive measurements where constant. Nothing was running, WiFi was ON and connected (Link Quality=64/70), screen brightness at 30%, Graphical target is using Gnome 3.
SystemD Target (~init level)
Linux 4.0 (in W)
Linux 4.1 (in W)
Progress
Multi-User (init 3)
12,8
8,66
-32%
Graphical (init 5)
13,1
8,51
-35%
Wow! That’s great. And the estimated battery power is now up from 4h to 6h30 with WiFi ON. But with light browsing usage and some Arduino development, I got a bit more than 5h15 without requiring a wall power connection!! That close to 50% more battery life than with earlier kernels.
Where does this come from? I don’t know. There seems to have been a few pull requests about power management for kernel 4,1 but none stroke me as relevant for such a huge improvement, Matthew Garrett has proposed a patch to improve dramatically the power efficiency of Intel’s Haswell and Broadwell CPUs (and I happen to have an Haswell one), so that could have been that patch, but I did not find it in the kernel 4.1 changelog, so I doubt it was yet implemented. So I really don’t know what made change in the kernel bring such an improvement. (note: I’m running Fedora 22 and without software update, just by selecting kernel 4.0 or 4.1 at boot, I can see the difference in power consumption. So this is really a kernel-side improvement).
Did you also witness improvement when switching to Linux kernel 4.1? Let me know using any social media means!
Note to self: telinit is now deprecated in favour of systemd targets. Runlevel 3 can be reached by invoking sudo systemctl isolate multi-user.target and the switch to the “runlevel 5” can be triggered using sudo systemctl isolate graphical.target.
Picture credits: Picture was created by me using elements from the KDE project. The original materials were licensed under GNU LGPLv3, and the picture is also provided under this license terms and conditions.
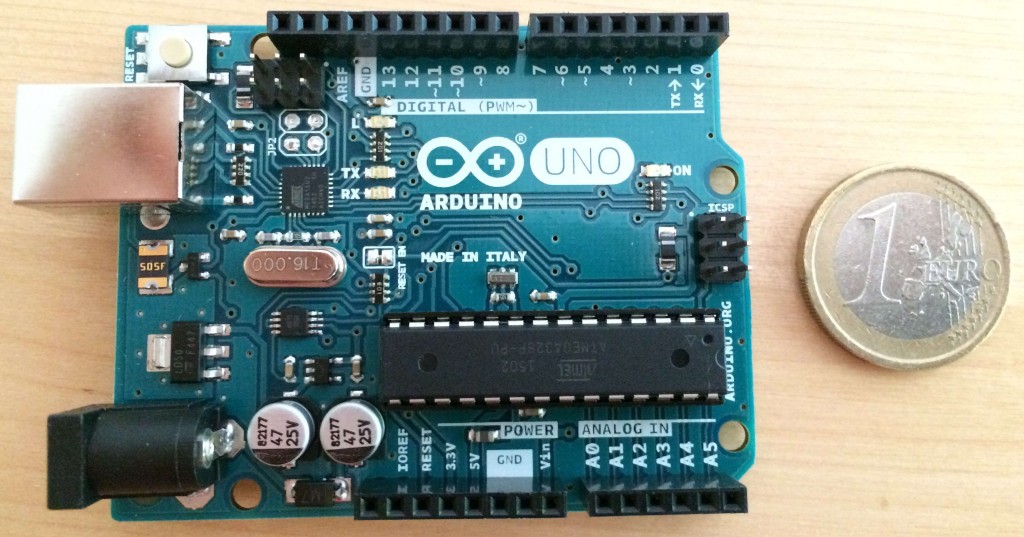
An Arduino Uno R3 – The 1 € coin is given for size comparison.
My goal is to use it to prototype something I want to make: a small network of temperature and humidity sensors running for months on batteries.
Why? First because I can (I need to learn a lot first regarding electronic or microcontrollers, but I’m sure I can). Second because we have add a few problems with humidity in our basement and I want to be able to have a better idea when this is happening to find a proper solution. My idea would be to correlate the measurements to others done externally and which would include more environmental data (e.g. pressure and amount of rain) and if possible with some events (e.g. gutters are overflowing water).
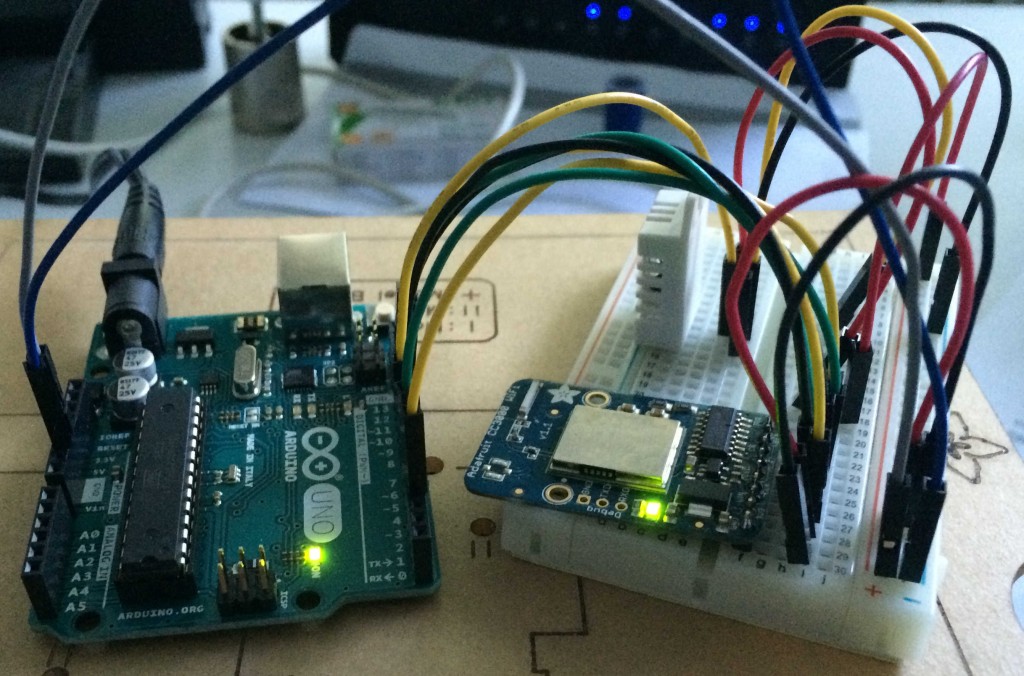
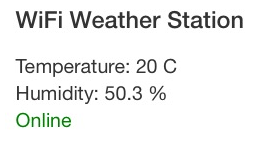
I already started the prototyping based on a tutorial from Adafruit – a Wifi Weather Station. The results works well as one could expect. So I validated my first part: yes I can do some basic electronic and microcontroller programming, the Raspberry Pi is doing the web server side.
My Prototype Environmental Sensor (WiFi based) v0.1A Simple Monitoring Web App (from Adafruit tutorial)
The next step is reprogramming the microcontroller to push data periodically using plain UDP and either a Graphite, Statsd or Fluentd syntax. This would be pushed to a multicast address which my Raspberry Pi would listen to, it would run the Graphite/Statsd/Fluentd stack (I’m going to start with Graphite alone and see how good it is). I want to keep historical data of at least one month, perhaps even a bit more and to be able to visualise the data in real time.
Once this is done, then I want to get rid of the WiFi module and use a transceiver in the 433 or 868 MHz band (I’m in Europe). The Raspberry Pi will be the gateway between this radio-protocol and the more standard computer network stack. So I would need to adapt whatever I had chosen for stack on my Raspberry Pi to be able to cope with the new type of input. Either I contribute to a project if it is well architectured, or I build a bridge interface.
Final step of the prototyping will be to go low power. I’ve already approximately calculated how long I could run on 2 AA rechargeable batteries with the latest Arduino prototype and my “guestimates” is that it won’t last more than a week (probably less). So far from ideal. The solution is to build your own “Arduino”, meaning taking the microcontroller only (plus a few required components for it to run) and the needed components for the sensor. It seems that the power draw from the battery in this case would be sub mA. So I should be able to run many months on a 2 AA batteries
A headless server by definition has no input devices such as a keyboard or a mouse which provides a great deal of external randomness to the system. Thus, on such a server, even if using rotational hard disks, it can be difficult to avoid the depletion of the Linux kernel’s random entropy pool. A simplified view of this situation is if the entropy pool is deemed too low, one of the “dices” which generates random numbers is getting biased. This is can be even more exacerbate on server hosted in virtual machines, but this article won’t help you in this case.
Update 2015-08-24: the article was updated to provide some more information on TPM and commands adapted to the new systemd-based Ubuntu 15.04 and newer. When marked, use either the classic commands from Ubuntu 14.04 LTS and older or the newer ones.
The level of the kernel entropy pool can be checked with the following command:
(Note depending of the workload of your server the above result could be considered adequate or not)
What means a depleted entropy pool? It means that any call to /dev/random would be blocking until enough entropy is available. A blocking call is not usually wished, it means the application could be considered frozen until the call is freed. On the other side, calls to /dev/urandom would not be blocking in such situation, but there is a higher risk that the randomness quality of the output decreases. Such a higher risk could mean giving a higher chance for an attacker to predict your next dice roll. This could be exploitable or not and it is hard to tell, at least for me. Therefore, I tend to try avoiding having a depleted entropy pool especially for certain workload.
There are several mechanism to provide randomness sources to the entropy pool. The haveged daemon uses some CPU clock timers variation to achieve that, but it is highly dependant of the CPU being used. Other approaches are using sound cards, etc. And finally there are hardware random number generators (RNG). In my previous article, I talked briefly about the hardware RNG from the Raspberry Pi. In this article, I will present another hardware RNG which is available in many computers and servers: Trusted Platform Module (TPM).
I found the name somewhat marketing, and I’m not even sure we should trust it that much. But we will activate it only to provide a new source of entropy and nothing more. I would advise to use other source of entropy as well. Anyway, if interested the following paragraphs are describing how to achieve this, and if you decide to implement them, be reminded that I give no warranty that it will work for you nor that it won’t break things. I can only guarantee you that it worked on my machine running Ubuntu 14.04.2 LTS.
Let’s install the necessary tools and deactivate the main services (the tools launch a daemon which we don’t want to use as we will use rngd to get and verify the randomness of the TPM RNG before feeding the entropy pool).
Then, you will need to go into the BIOS/EFI settings of your computer/server and activate TPM, and possibly clear the ownership of the TPM if it happened to be owned by someone else. Of course, don’t do that if it is not your computer.
I found out that my particular BIOS option only allow clearing from the BIOS settings. Trying to do so from the OS results in the following:
$ sudo tpm_clear --force
Tspi_TPM_ClearOwner failed: 0x0000002d - layer=tpm, code=002d (45), Bad physical presence value
I also found out that my particular BIOS when clearing the ownership, deletes also the Endorsement Key (EK). When I was trying to take ownership of the TPM device (see further) I was getting the following error:
$ sudo tpm_takeownership
Tspi_TPM_TakeOwnership failed: 0x00000023 - layer=tpm, code=0023 (35), No EK
So I had to do an extra step, to generate a new EK:
$ sudo tpm_createek
After having creating a new EK, I was able to successfully take ownership of the TPM device.
$ sudo tpm_takeownership
Enter owner password:
Confirm password:
Enter SRK password:
Confirm password:
tpm_takeownership succeeded
Once all this is done, we are ready to load the TPM RNG kernel module and launch the user space tool that will use this source to feed the Linux kernel entropy pool. The user space tool are the rng-tools suite (with the rngd daemon).
Load the kernel module (to load it permanently add tpm_rng as a new line to /etc/modules):
$ sudo modprobe tpm_rng
And then install the user space tool.
$ sudo apt install rng-tools
The default configuration should be good enough. But you can check it by editing the file /etc/default/rng-tools. The default settings for rngd are to not fill more than half of the pool. I don’t advise to set it to higher, unless you really trust blindly those TPM chips. If you have installed the tool, it should already be running but if you modified the default settings then a restart is necessary.
Ubuntu 14.04 LTS
$ sudo service rng-tools restart
Ubuntu 15.04 and newer
$ sudo systemctl restart rng-tools.services
Now you can check again the available entropy with the command that I gave at the beginning of this post.
As I announced, I got a Raspberry Pi 2 Model B and although I did not get much time to play yet with it, it was just an excuse to get back to programming and a little computer science fun.
Anyway, I’ve installed Raspbian on it and did a few configurations which I think are worthy to share with others. I’m not going to describe a step-by-step to install a Linux distribution on your Pi, I recommend trying NOOBS and check the good documentation from the Raspberry Pi Foundation. With this setup you can choose during the installation process which Linux distribution to install.
That’s what I did as a warm-up and a quick way to get an up-and-running Pi.
Note that the Raspberry Pi 2 has a new CPU (ARMv7) which is not yet fully exploited by most distribution targeted at the Raspberry Pi ecosystem (with the exception of the Linux kernel). There is one exception: Snappy Ubuntu Core but it is yet alpha. However it should be possible to install most standard Linux distribution that are supporting ARMv7 instructions set, however this is an interesting exercise which I did not perform (yet).
Anyway, using the NOOBS installation or any of the images provided for SD Card has several implication in terms of security. Here is what I recommend to do after the first boot.
Changing password and locking root
If you use the Raspbian installation, then you have one user account `pi’. If you haven’t changed the password for this user during installation, then better do it now. Once connected as `pi’ do:
$ passwd
And enter and then confirm the password you want to use.
With Raspbian, the `pi’ user has administrator’s rights. You can call sudo to perform system changes. If you are comfortable with that, then simply lock the root account:
$ sudo passwd -dl root
Or if you simply want to give a password of your own and use root:
$ sudo passwd root
Getting some Entropy
I am preparing a more detail article on this topic, so for now I am only going to give some background and the commands to increase the sources of entropy. Entropy is important, you need sufficient entropy (which your Linux kernel can gather for you) to be able to generate good pseudo-random numbers. Those numbers are used by many cryptographic services, such as generating SSH keys or SSL/TLS certificates.
The problem with embedded devices such as the Raspberry Pi (especially if you run it headless like I do) is that there aren’t many sources of entropy available to the kernel, especially at boot time.
The Raspberry Pi has an integrated hardware random number generator (HW RNG) which Linux can use to feed its entropy pool. The implication of using such HW RNG is debatable and I will discuss it in the coming article. But here is how to activate it.
First of all, load the kernel module (aka driver) for the HW RNG (the Raspberry Pi 2 can use the same kernel module as the Raspberry Pi 1 models). The Linux way of doing it is via modprobe:
$ sudo modprobe bcm2708-rng
If it worked a new device should be now available /dev/hwrng and the following should be visible in the system messages:
To make the change permanent, on any Linux system you simply load the module in the /etc/modules file by adding a new line with bcm2708_rng (see next command). Or you can use the Raspberry Pi firmware Device Tree (DT) overlays (see below).
$ sudo bash -c 'echo bcm2708_rng >> /etc/modules'
Now install the rng-tools (the service should be automatically activated and started, default configuration is fine, but you can tweak/amend it in /etc/default/rng-tools)
$ sudo apt-get install rng-tools
After awhile you can check the level of entropy in your pool and some stats on the rng-tools service:
$ echo $(cat /proc/sys/kernel/random/entropy_avail)/$(cat /proc/sys/kernel/random/poolsize)
1925/4096
$ sudo pkill -USR1 rngd; tail -15 /var/log/syslog
rngd[7231]: stats: bits received from HRNG source: 100064
rngd[7231]: stats: bits sent to kernel pool: 40512
rngd[7231]: stats: entropy added to kernel pool: 40512
rngd[7231]: stats: FIPS 140-2 successes: 5
rngd[7231]: stats: FIPS 140-2 failures: 0
rngd[7231]: stats: FIPS 140-2(2001-10-10) Monobit: 0
rngd[7231]: stats: FIPS 140-2(2001-10-10) Poker: 0
rngd[7231]: stats: FIPS 140-2(2001-10-10) Runs: 0
rngd[7231]: stats: FIPS 140-2(2001-10-10) Long run: 0
rngd[7231]: stats: FIPS 140-2(2001-10-10) Continuous run: 0
rngd[7231]: stats: HRNG source speed: (min=824.382; avg=1022.108; max=1126.435)Kibits/s
rngd[7231]: stats: FIPS tests speed: (min=6.459; avg=8.161; max=9.872)Mibits/s
rngd[7231]: stats: Lowest ready-buffers level: 2
rngd[7231]: stats: Entropy starvations: 0
rngd[7231]: stats: Time spent starving for entropy: (min=0; avg=0.000; max=0)us
Securing SSH – the basic
I run my Pi headless for the moment. So after the first boot, I went into the advanced configuration of the raspi-config and activated SSH daemon. I’m not here going to describe how to properly secure the SSHd daemon, which can be a topic for a future article. I’m only going to focus on one topic which is SSH host keys.
SSH host keys are the means for a user connecting to a remote server to verify the authenticity of the server. That the sort of message you see the first time you connect to an SSH server:
$ ssh pi@raspberrypi
The authenticity of host 'raspberrypi (192.168.1.52)' can't be established.
ECDSA key fingerprint is 42:3d:4f:b7:0b:4b:62:11:47:28:cc:86:76:0c:ac:24.
Are you sure you want to continue connecting (yes/no)?
If an attacker tries to spoof your SSH server, on connection you will get this message:
$ ssh pi@raspberrypi
@@@@@@@@@@@@@@@@@@@@@@@@@@@@@@@@@@@@@@@@@@@@@@@@@@@@@@@@@@@
@    WARNING: REMOTE HOST IDENTIFICATION HAS CHANGED!     @
@@@@@@@@@@@@@@@@@@@@@@@@@@@@@@@@@@@@@@@@@@@@@@@@@@@@@@@@@@@
IT IS POSSIBLE THAT SOMEONE IS DOING SOMETHING NASTY!
Someone could be eavesdropping on you right now (man-in-the-middle attack)!
It is also possible that a host key has just been changed.
The fingerprint for the ECDSA key sent by the remote host is
42:3d:4f:b7:0b:4b:62:11:47:28:cc:86:76:0c:ac:24.
Please contact your system administrator.
Add correct host key in /home/pithagore/.ssh/known_hosts to get rid of this message.
Offending ECDSA key in /home/pithagore/.ssh/known_hosts:3
  remove with: ssh-keygen -f "/home/pithagore/.ssh/known_hosts" -R raspberrypi
ECDSA host key for raspberrypi has changed and you have requested strict checking.
Host key verification failed.
So this is all good, but the problem with these host keys is that you cannot really trust the one installed by default. They could be the same as the one from the image you downloaded and flashed on your SD Card, and so would be similar to all other persons installing the same image. Another problem is that they could have been generated at a point in the installation where not enough entropy was gathered by the kernel to be able to provide non-predictable random numbers. Therefore someone could use this to generate new host keys that would match the one on your Raspberry Pi.
Now that in the earlier chapter we added good source to feed the entropy pool, we can regenerate better host keys. First get rid off the previous ones:
$ sudo rm /etc/ssh/ssh_host_*key{,.pub}
Then generate new ones with one of the 3 possibilities:
Automatic configuration using dpkg
$ sudo dpkg-reconfigure openssh-server
Creating SSH2 RSA key; this may take some time ...
Creating SSH2 ECDSA key; this may take some time ...
Restarting OpenBSD Secure Shell server: sshd.
Now if you want to print the fingerprint of any of your host keys to make sure of the authenticity of the server you are connecting to (should only be needed the first time your client connects to your server):
This mini how-to is to install Gnome on Ubuntu 14.04 LTS. Of course the best approach would have been to install Ubuntu Gnome in the first place. But if you didn’t (like me) and have Unity as desktop and would like Gnome (or just give it a try), check the rest of this article.
Note and disclaimer: Gnome3 will be available alongside Unity. So you can always switch back and forth between the two without troubles. However, a word of caution, as usual with system modifications, make sure you have backups available and working before proceeding. I make no guarantee that the following will work for you. I’m only stated it worked for me.
Installing Gnome Shell (aka Gnome3)
Installing the “core” Gnome 3 is rather easy. You need to have the Universe repository activated and then:
During installation of gnome-shell, you will be prompted to choose between GDM (the default Gnome Display Manager) and LightDM (an alternative Ubuntu is using by default). The main functions of these DM, from an end user perspective, is that they provide a graphical login where you can choose the user (and type a password) and choose the desktop environment to use once logged in. In addition these DM can offer things such as autologin. There is no wrong answer here. You can stick with LightDM (it is the one installed by default on UBuntu, and that’s the option I chose) or switch to GDM. In both cases, you need to choose for the session if you wish to use Gnome or Unity desktop environment.
Now you can log out and log in again (choosing Gnome for the session).
Installing some missing default Gnome Apps
This is entirely optional. If you have seen Gnome3 release notes, you will be looking for a few extra applications that are not installed by default by Ubuntu and that are available in the Universe repository. Example applications: Gnome Maps, Gnome Weather, etc.
To install them, you can either install the gnome-core package which will install a minimal Gnome applications environment to start with. Or install a complete Gnome applications environment (which includes all of gnome-core) by installing the package gnome. Or finally simply install a few goodies (a subselection of gnome) that is tailored to your needs. Here is a list of goodies that I installed (from Universe Repos):
Note: I am making the following assumptions, you know what you are doing, you activated SSH on your box and know how to connect as root, you know and understand how your NAS HDD have been configured, you have a wokring backup of your HDD data, you are not afraid of losing your data.
First find out what is the drive name of your volume(s) and also what is the filesystem type:
# mount
/dev/root on / type ext4 (rw,relatime,barrier=0,journal_checksum,data=ordered)
(...)
/dev/mapper/vol1-origin on /volume1 type ext4 (usrjquota=aquota.user,grpjquota=aquota.group,jqfmt=vfsv0,synoacl)
/dev/mapper/vol2-origin on /volume2 type ext4 (usrjquota=aquota.user,grpjquota=aquota.group,jqfmt=vfsv0,synoacl)
In my case, I have created 2 volumes on top of my mirror. The device on which these volumes are stored are /dev/mapper/vol1-origin and vol2-origin, they are both ext4 filesystems. But you probably do not have such a setup and only have one volume on top of your RAID array and your device might simply be /dev/md[x].
The fact that my devices were in /dev/mapper hinted me that they might be a LVM layer somewhere. So I executed the following command (harmless):
So my 2 volumes are LVM logical volumes. Now that I have this information, I can do the following to verify the filesystems’ health. First of all, shutting down most services and unmounting the filesystems:
# syno_poweroff_task
Now if you did not have LVM but rather a /dev/md[x] device, you can simply do (if you have an ext2/ext3/ext4 filesystem only, and replace the ‘x’ by the correct number):
# e2fsck -pvf /dev/mdx
But if like me you have LVM, then you will need a few extra steps. The ‘syno_power_off’ has probably deactivated the LVM logical volumes, to be sure check the “LV Status” given by the next command (harmless, not the complete output is here given):
# lvdisplay
--- Logical volume ---
LV Name                /dev/vg1/volume_1
VG Name                vg1
LV UUID                <UUID>
LV Write Access        read/write
LV Status              NOT available
LV Size                1.00 TB
As you can see the logical volume is not available. We need to make it available so that the link to the logical volume is accessible:
# lvm lvchange -ay vg1/volume_1
# lvdisplay
--- Logical volume ---
LV Name                /dev/vg1/volume_1
VG Name                vg1
LV UUID                <UUID>
LV Write Access        read/write
LV Status              available
# open                 0
LV Size                1.00 TB
The status has changed now to “available”, so we can proceed with the filesystem verification:
# e2fsck -pvf /dev/vg1/volume_1
To finish this, you need to remount and restart all the stopped services. I do not know a specific Synology command to do that, so I simply rebooted the machine:
Measuring and understanding how a process is using the primary memory (aka RAM) is complex because Operating System have been optimising primary memory use to save space or optimise run time (memory map, virtual memory, kernel same page merging, etc.). Therefore most tasks managers are reporting several metrics to inform about memory usage, and even their own help page are sometimes reporting a wrong definition for a metric. So I am always learning new things about what actually all those metrics are measuring. Today’s is PSS:
Linux’s PSS (Proportional Set Size) metric. This is the amount of RAM actually mapped into the process, but weighted by the amount it is shared across processes. So if there is a 4K page of RAM mapped in to two processes, its PSS amount for each process would be 2K. The nice thing about using PSS is that you can add up this value across all processes to determine the actual total RAM use. – Android Developer Blog, Understanding How Your App Uses RAM
I am a recent owner of a smartphone (since August 2013), it is a relatively old one, a Samsung Galaxy S (GT-I9000), but it is still a usable and cool computer-in-a-pocket/phone.
Samsung dropped support for the phone a long time ago, but other projects picked-up and you can install various Android distributions on it. I am running CyanogenMod 10.2 (Android 4.3) and it works great.
I would anyway have done so even if Samsung would have continued support but that could be a story for another post and another day.
Encryption has slowed down the phone
However, one month ago I decided to encrypt the phone, this was a good idea (and I would recommend anyone to use encryption on a device as mobile as phones) but it turned out to slow down excessively everything on the phone up to the point that I was barely using it. Even calling or answering the phone was a pain.
I was decided to revert the encryption without losing too much of the data/settings of the phone. Here is how I did it.
Note: the following steps worked for me, it does not necessary means it will work for anyone. I cannot be held responsible if by using this shared experience you lose any data.
Approach to revert the phone encryption
The approach is to do a full backup, restore to phone to “factory” settings (restoring the installed OS without encryption or any settings) and applying back the backup.
This approach should work on any Android version. But the instructions here are given for Android 4.x release, and for some steps are specific to CyanogenMod 10.1 and above and/or Samsung Galaxy S. If you have a different phone or Android, you will have to find the specifics by yourself (when there will be specific instructions, I will mention it either with CM10 for CyanogenMod 10.x or with SGS for Samsung Galaxy S).
Prerequisite
As mentioned in the previous chapter, these instructions could work for other phones and Android versions, but I mention here only my own setup, the one on which I successfully went through these steps.
My environment:
A Samsung Galaxy S (GT-I9000) phone with CyanogenMod 10.2 installed;
Please make sure to install the ADT Bundle to be able to use adb.
A micro-USB cable to connect your phone to your computer.
Backup your data
For the backup, I have used adb (Android Debug Bridge) and I have used the recovery mode to reset to factory the phone. The rest of this section contains the various steps to do the backup.
Activate the adb daemon on the phone (CM10)
This steps depends on your Android flavour, please refer to your Android phone manufacturer documentation or community project. The instructions in this section apply to CyanogenMod 10.x.
When using CyanogenMod 10.2, you need to activate the Developer Options. This is done by taping 7 times the build number field in the About section of your phone Settings. You now have a new section in your Settings dubbed Developer Options.
Authorise to gain root access via adb
Under Developer Options you can tick ON USB debugging which will activate the adb daemon once you connect your phone to a computer.
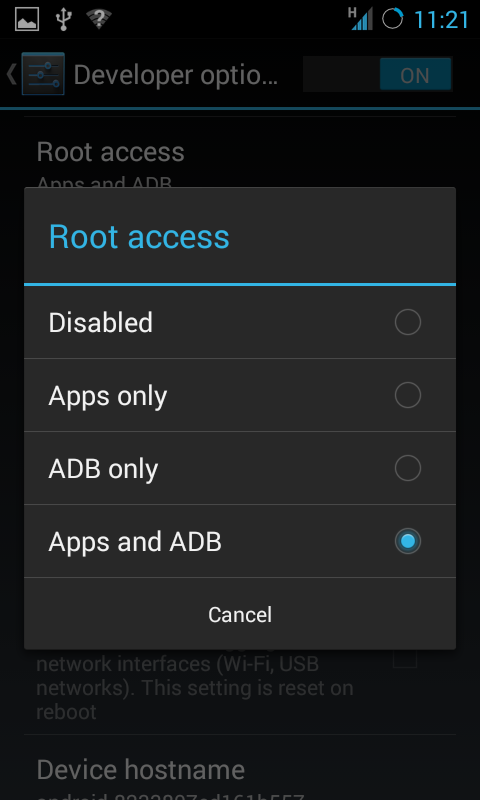
You need to also be able to give root access via adb in order to perform a full backup (that is my assumption). This is done by selecting ADB only or Apps and ADB in the Root access option under Developer Options (see screenshot).
Now plug your phone to your computer, your phone should ask for a USB debugging authorisation from the connected computer. You should authorise that.
You have now your phone ready to receive commands from your computer using adb.
Backup the phone using adb
The instructions in this section will be given for Unix/Linux/OS X. They work the same way for Windows, but the file path names will be different (e.g. ‘\’ instead of ‘/’, and so on). I am not going to give here Windows instruction. I assume that if you were able to install CyanogenMod on your phone, you can “translate” the below instruction for your platform. If you need assistance on Windows, you can use this excellent answer by Ryan Conrad.
Under Unix/Linux/OS X simply open up a Terminal. And go to where adb was installed. I assume below that you unpack ADT in your Desktop folder:
cd ~/Desktop/adt-bundle*/sdk/platform-tools
Now run the following command which will create a backup in your Desktop folder. This backup will include all applications and their data, all shared data (e.g. sdcard content) and full system backup.
Once you typed in this command, your device will ask you to confirm the operation and provide a password to encrypt the backup. I have used the same password as for the phone encryption, but I guess any password should work. Carefully remember the password because you will need it when restoring.
After you authorised the backup, it will take a while before it is completed (it took about 20 minutes for me).
Sadly, and this is a risk you will have to take, I know of no way to test the generated backup. After the completion of the above procedure, I simply checked the size of the file and verified that it could reasonably (even with some compression) contains my phone data. If you know better, let me know and I will update this section.
Reset to factory
Now come the part where you take some risk. In order to revert the encryption on the phone, we need to reset it to factory settings, which includes wiping out all your data. If the previous backup did not work or if your backup gets corrupted, your data might be lost once this step is performed. It is a good time to make a copy of the generated backup somewhere safe in case something goes wrong.
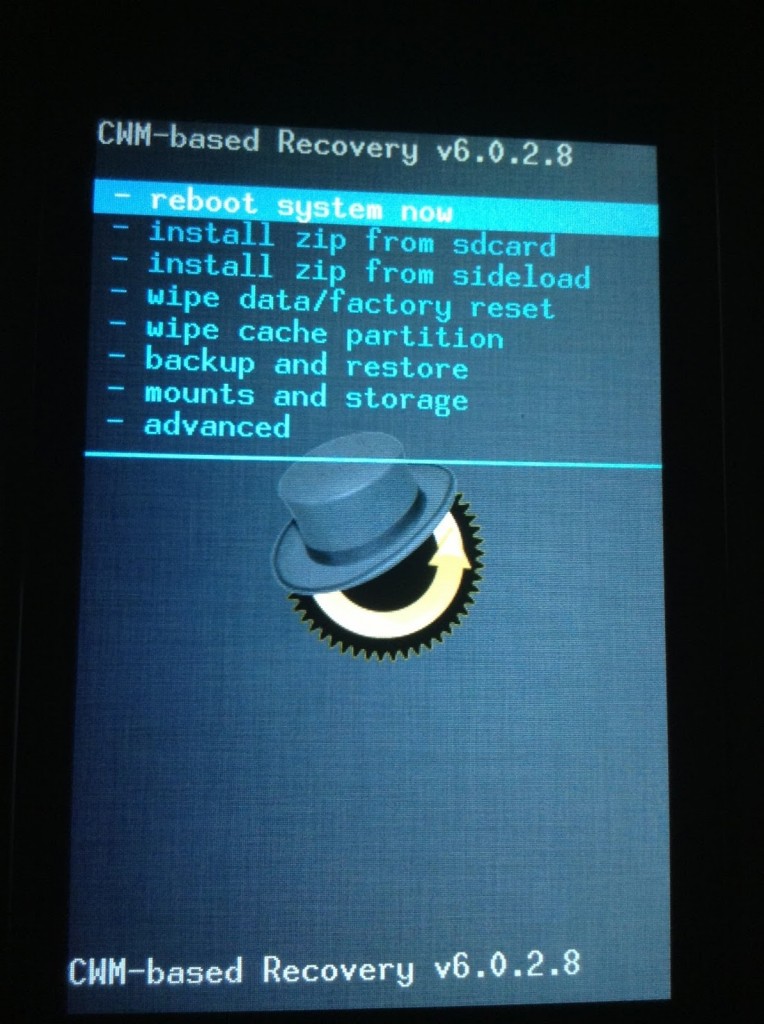
ClockWorkMod Recovery menu (copyright Makvana @TheUnlockr)
First unplug your phone’s USB cable from the computer (this is optional I believe, but I think it is safer) and shutdown the phone. Once switched off, start your phone in recovery mode (e.g. on Galaxy S this is Volume Up + Home + Power). I assume you know how to use the recovery menu, without which you could not have installed your CyanogenMod version. But as a quick reminder, Volume Up/Down correspond to Arrow Up/Down and the Home button corresponds to Select.
Once in recovery mode, select the item wipe data/factory reset and proceed. This will delete all data on your phone, you have been warned. You will be asked to confirm and you should do so.
You have now a non encrypted phone freshly cleaned. We will need to restore your data. So please reboot the phone by selecting reboot system now.
Restore your data
After the reboot (it can take awhile, like a couple of minutes), you will be prompt to connect to your CyanogenMod and Google accounts. I do not have the former but do use the latter. So I skip the first step (which was registering the CM account) but proceeded with setting up my Google account.
Note: I am using Google 2-step verification and I did not remember my application password that I set-up for my Android phone. So I went to Google’s Account Security Settings on my computer and generated a new application password and revoking the previous one.
During the setup of my Google account I explicitly asked Google to restore my phone (I did use the phone built-in Google backup). After the setup, I waited that Google’s restore was over. Not much is restored by this feature, so I guess it is possible to skip this step, YMMV.
cd ~/Desktop/adt-bundle*/sdk/platform-tools
./adb restore ~/Desktop/$(date +%F)-android-backup.abkp
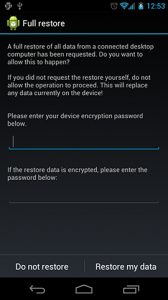
Android request confirmation to restore (image courtesy of Ryan Conrad)
Note: if you were doing this late at night and have done the backup before midnight and are doing now the restore after midnight, you will need to remove “$(date +%F)” and replace it by yesterday’s date.
The restoration process will prompt a confirmation on your phone and ask you to enter the same password you used when you created the backup. Hopefully you remember it and can proceed.
The restoration is quite slower than the backup, and after 20 minutes I went to bed. So I do not know how long it took exactly. The app Google Play crashed several time during the restoration which did not seem to affect the process.
Once the restoration was completed, I rebooted the phone just to be safe.
Clean-up
Do not yet delete the full backup on your computer, keep it for awhile just in case.
But you should definitively restore the Developer Options to their original settings:
Root access: Apps only
USB debugging: OFF (unticked)
And switch OFF the Developer Options all together. You can unplug your phone from your computer and delete ADT bundle from it too (though I would keep it as long as the full backup file).
What worked and What didn’t
With my own experience, everything was restored but some applications authentication, no was data loss. So the approached was a success IMHO.
Some applications lost the authentication, I simply either had to request sign-in and it auto-magically found the account information again (e.g. Firefox Sync) or to request sign-in and fill in my login and password again.
Regarding specifically Google’s 2-step verification and the Google’s Authenticator app, the configuration of this application was not restored, but via Google Account’s Security I was able to set it up again in no time, which has invalidated the previous configuration at the same time. So perfect restoration with this extra step.
Conclusion
My phone is now unecrypted, which is sad, but on the other hand I can use it again. It is now reasonably fast again that I can use applications and browse the web on the go. CyanogenMod 10.2 is a great update, the phone feels more responsive and as definitively more battery life (recharging it every 48h instead of every 36h).
I should start a video serie “fun with flags 64-bit theories”, but for now I will stick with only this short article. Here is the ironic part:
“There’s no shortage of pundits and self-described experts asserting that Apple’s shift to a 64-bit architecture is either a hoax, a pointless marketing ploy that will deliver no real benefit, or an inevitable shift that everyone will eventually follow anyway at some point, and therefore neither newsworthy nor deserving of any credit.” – for Apple Insider, Daniel Eran Dilger
The journalist then went on citing several Apple statements out of the iOS development guidelines. Considering those statements as true because aimed at developers. I guess that should be viewed as scientific proof You can read the full article though, it is not all bad, and better than many others I have recently read on the subject. But up to now, the most accurate comments on the new 64-bit ARM CPU for Apple’s iPhone 5s is from Anand. One of those statement is:
“When all apps running on the device are compiled for the 64-bit runtime, iOS never loads the 32-bit versions of those libraries, which means that the system uses less memory and launches apps more quickly,” – Apple
This is slightly marketing terms. A 64-bit apps is likely to use more memory than the same 32-bit counter part, most basic data types have had their size increased. But this is true that the 32-bit stack does not need to be loaded. There is an engineering trade-off to make per app: does the gain in memory consumption when switching to 64-bit exceeds the 32-bit stack footprint? But the author does not get that point and conclude that:
“The company also outlines why it will be beneficial for third party apps to release 64-bit versions of their titles for users, even if those apps don’t in themselves score massive gains from the move to 64-bits: the key result will be lower memory use for the end user.” – for Apple Insider, Daniel Eran Dilger
Lower memory use for the end user when 3rd party apps release 64-bit apps? That would be astonishing. If all 3rd party apps were 64-bit then there is no need for 32-bit stack, but I guess this stack represents a fraction of the overall available/used memory. Apple is also recognising this drawback of 64-bit systems as they state later on:
“Because so many fundamental types have increased in size, the 64-bit version of your app uses more memory than the 32-bit version does. (…) Expect to spend more time optimizing the performance of the 64-bit version of your app.” – Apple
But this is something the journalist blatently ignore.
Note: Moving from 32-bit to 64-bit does not mean you need twice the amount of memory. Not all data types have their size doubled, and apps can be refactor to use less demanding data types.
Then the stunt on the 64-bit memory model (either LP64, LLP64 or ILP64) is also a funny one. Really who cares unless you are a developer which has to use binary data or which needs to optimise an app for memory usage? Unix decided long ago to go the LP64 way (although I do not think all Unix flavour did follow it) after evaluation (performing a trade-off) severa criterias including portability, interoperability or performance. And Windows decided to go the LL64 way, which is not bad either. And regarding performance differences between those models, it only affects the memory pressure and depending on the application this can have no impact or some performance hit. And in this regard, Microsoft choices for Windows would limit the memory pressure when directly recompiling a 32-bit apps for 64-bit.
I am not going on to talk about the journalist speculations on Android move to 64-bit with its engineering and business chalenges. I fully agree that moving to 64-bit has its challenges, and then moving the apps ecosystem is another challenge of its own. But I do not think that moving the core of Android, including Dalvik, to 64-bit is as difficult as the author is implying at least from a pure technical stand. But like him, this is my gut feeling and I have nothing to base this statement on! Hence, I won’t talk about it.
Overall, this journalist, Daniel E. Dilger, is doing a better jobs than many other before him regarding the 64-bit transition which Apple is trying to do for its mobile ecosystem. But this article is clearly biaised towards Apple and in order to be so, the journalist has taken many shortcut and wrongly understood statements made for developers (not journalists!).
Note: I love Apple since many years, I have a MacBook and an iPad (and an iPod lying somewhere). But I am pationate about Linux since almost its inception, and thus I do have an old computer and several VMs running it. I also have an Android phone since recently. The only OS which I do not stand but forced to use (only for work) is Windows. So with this context in mind, I guess my opinions above are rather objective.
I do have a NAS already which has the following services: File Sharing (Samba, AFS and NFS), Media Streaming Server (DLNA), VPN Server, Cloud Sync Repository. So I do not intend to have redundant services on my Home Server. What is left?
(N)-IDS: As I have services open to the internet, I want to take some precautions and check that no exploits is taken advantage of. I am not sure this is enough, but it is the least I can do. Implementations: AIDE or Suricata.
DNS cache/server: I am thinking of hosting my own DNS server to perform some caching and hopefully enhance a bit the browsing experience in terms of performance. Though I would need to benchmark this to make sure I have any gain as I suspect my old router to do some caching. Implementation: dnsmasq.
DHCP server: My home router is a Netgear WG614 and its features for what concern DHCP are fairly limited, having my home server addressing this issue is a nice idea (until we get a better router). I could be even tightly coupled with the DNS server (see earlier bullet point) so that one could use hostname within the local network. Implementation: dnsmasq.
Syslog server
Maybe – ownCloud: maybe one day I would prefer to use an open source solution for Cloud Sync rather than the closed source one from my NAS vendor.
*: FreeBSD support is uncertain.
As one can see, I could use Linux or BSD based OS or a mixture. However, ZFS is so compelling that I am seriously considering to go for FreeBSD+jails and basta cosi! February will be the month where I try to set-up a FreeBSD server.




 A headless server by definition has no input devices such as a keyboard or a mouse which provides a great deal of external randomness to the system. Thus, on such a server, even if using rotational hard disks, it can be difficult to avoid the depletion of the Linux kernel’s random entropy pool. A simplified view of this situation is if the entropy pool is deemed too low, one of the “dices” which generates random numbers is getting biased. This is can be even more exacerbate on server hosted in virtual machines, but this article won’t help you in this case.
 but that could be a story for another post and another day.