How to revert phone encryption on Android

How to revert your Smartphone encryption, credit: image based on Oxygen Icons
Smartphone Encryption Reverted

I am a recent owner of a smartphone (since August 2013), it is a relatively old one, a Samsung Galaxy S (GT-I9000), but it is still a usable and cool computer-in-a-pocket/phone.

Samsung dropped support for the phone a long time ago, but other projects picked-up and you can install various Android distributions on it. I am running CyanogenMod 10.2 (Android 4.3) and it works great.

I would anyway have done so even if Samsung would have continued support ;-) but that could be a story for another post and another day.

Encryption has slowed down the phone

However, one month ago I decided to encrypt the phone, this was a good idea (and I would recommend anyone to use encryption on a device as mobile as phones) but it turned out to slow down excessively everything on the phone up to the point that I was barely using it. Even calling or answering the phone was a pain.

I was decided to revert the encryption without losing too much of the data/settings of the phone. Here is how I did it.

Note: the following steps worked for me, it does not necessary means it will work for anyone. I cannot be held responsible if by using this shared experience you lose any data.

Approach to revert the phone encryption

The approach is to do a full backup, restore to phone to “factory” settings (restoring the installed OS without encryption or any settings) and applying back the backup.

This approach should work on any Android version. But the instructions here are given for Android 4.x release, and for some steps are specific to CyanogenMod 10.1 and above and/or Samsung Galaxy S. If you have a different phone or Android, you will have to find the specifics by yourself (when there will be specific instructions, I will mention it either with CM10 for CyanogenMod 10.x or with SGS for Samsung Galaxy S).

Prerequisite

As mentioned in the previous chapter, these instructions could work for other phones and Android versions, but I mention here only my own setup, the one on which I successfully went through these steps.

My environment:

  • A Samsung Galaxy S (GT-I9000) phone with CyanogenMod 10.2 installed;
  • A computer (OS X 10.9) with ADT installed (version 20131030);
    • Please make sure to install the ADT Bundle to be able to use adb.
  • A micro-USB cable to connect your phone to your computer.

Backup your data

For the backup, I have used adb (Android Debug Bridge) and I have used the recovery mode to reset to factory the phone. The rest of this section contains the various steps to do the backup.

Activate the adb daemon on the phone (CM10)

This steps depends on your Android flavour, please refer to your Android phone manufacturer documentation or community project. The instructions in this section apply to CyanogenMod 10.x.

When using CyanogenMod 10.2, you need to activate the Developer Options. This is done by taping 7 times the build number field in the About section of your phone Settings. You now have a new section in your Settings dubbed Developer Options.

Authorise to gain root access via adb

Under Developer Options you can tick ON USB debugging which will activate the adb daemon once you connect your phone to a computer.

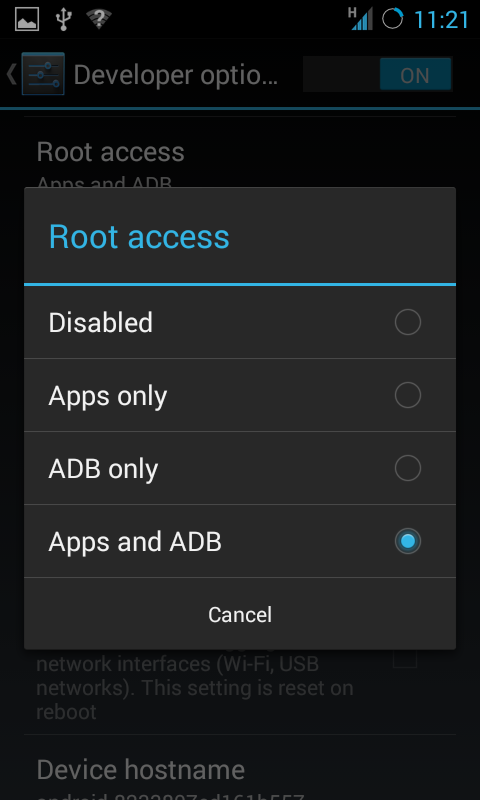
You need to also be able to give root access via adb in order to perform a full backup (that is my assumption). This is done by selecting ADB only or Apps and ADB in the Root access option under Developer Options (see screenshot).

Now plug your phone to your computer, your phone should ask for a USB debugging authorisation from the connected computer. You should authorise that.

You have now your phone ready to receive commands from your computer using adb.

Backup the phone using adb

The instructions in this section will be given for Unix/Linux/OS X. They work the same way for Windows, but the file path names will be different (e.g. ‘\’ instead of ‘/’, and so on). I am not going to give here Windows instruction. I assume that if you were able to install CyanogenMod on your phone, you can “translate” the below instruction for your platform. If you need assistance on Windows, you can use this excellent answer by Ryan Conrad.

Under Unix/Linux/OS X simply open up a Terminal. And go to where adb was installed. I assume below that you unpack ADT in your Desktop folder:

cd ~/Desktop/adt-bundle*/sdk/platform-tools

Now run the following command which will create a backup in your Desktop folder. This backup will include all applications and their data, all shared data (e.g. sdcard content) and full system backup.

./adb backup -apk -shared -all -f ~/Desktop/$(date +%F)-android-backup.abkp

Once you typed in this command, your device will ask you to confirm the operation and provide a password to encrypt the backup. I have used the same password as for the phone encryption, but I guess any password should work. Carefully remember the password because you will need it when restoring.

After you authorised the backup, it will take a while before it is completed (it took about 20 minutes for me).

Sadly, and this is a risk you will have to take, I know of no way to test the generated backup. After the completion of the above procedure, I simply checked the size of the file and verified that it could reasonably (even with some compression) contains my phone data. If you know better, let me know and I will update this section.

Reset to factory

Now come the part where you take some risk. In order to revert the encryption on the phone, we need to reset it to factory settings, which includes wiping out all your data. If the previous backup did not work or if your backup gets corrupted, your data might be lost once this step is performed. It is a good time to make a copy of the generated backup somewhere safe in case something goes wrong.

ClockWorkMod Recovery menu
ClockWorkMod Recovery menu (copyright Makvana @TheUnlockr)

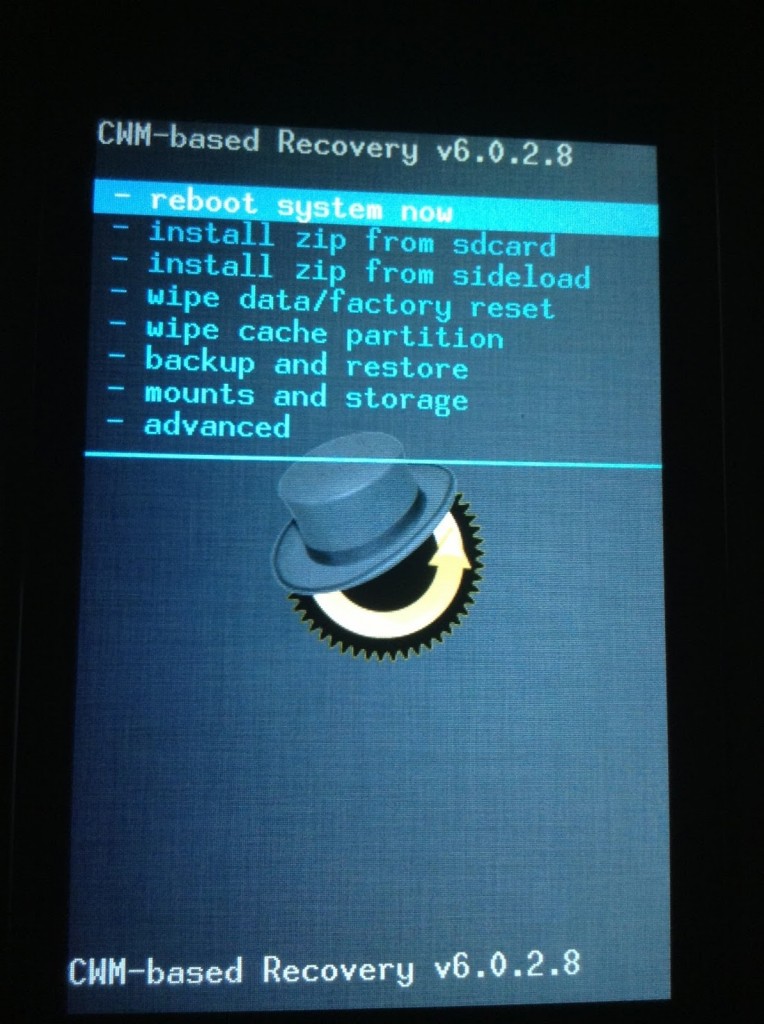
First unplug your phone’s USB cable from the computer (this is optional I believe, but I think it is safer) and shutdown the phone. Once switched off, start your phone in recovery mode (e.g. on Galaxy S this is Volume Up + Home + Power). I assume you know how to use the recovery menu, without which you could not have installed your CyanogenMod version. But as a quick reminder, Volume Up/Down correspond to Arrow Up/Down and the Home button corresponds to Select.

Once in recovery mode, select the item wipe data/factory reset and proceed. This will delete all data on your phone, you have been warned. You will be asked to confirm and you should do so.

You have now a non encrypted phone freshly cleaned. We will need to restore your data. So please reboot the phone by selecting reboot system now.

Restore your data

After the reboot (it can take awhile, like a couple of minutes), you will be prompt to connect to your CyanogenMod and Google accounts. I do not have the former but do use the latter. So I skip the first step (which was registering the CM account) but proceeded with setting up my Google account.

Note: I am using Google 2-step verification and I did not remember my application password that I set-up for my Android phone. So I went to Google’s Account Security Settings on my computer and generated a new application password and revoking the previous one.

During the setup of my Google account I explicitly asked Google to restore my phone (I did use the phone built-in Google backup). After the setup, I waited that Google’s restore was over. Not much is restored by this feature, so I guess it is possible to skip this step, YMMV.

Now it is time to restore the full backup. You will need to reactivate the adb daemon, please refer to the above chapter. And once again the following instructions are given only for Unix/Linux/OS X and you will need a Terminal.

cd ~/Desktop/adt-bundle*/sdk/platform-tools
./adb restore ~/Desktop/$(date +%F)-android-backup.abkp
Android request confirmation to restore (image courtesy of Ryan Conrad)

Note: if you were doing this late at night and have done the backup before midnight and are doing now the restore after midnight, you will need to remove “$(date +%F)” and replace it by yesterday’s date. ;-)

The restoration process will prompt a confirmation on your phone and ask you to enter the same password you used when you created the backup. Hopefully you remember it and can proceed.

The restoration is quite slower than the backup, and after 20 minutes I went to bed. So I do not know how long it took exactly. The app Google Play crashed several time during the restoration which did not seem to affect the process.

Once the restoration was completed, I rebooted the phone just to be safe.

Clean-up

Do not yet delete the full backup on your computer, keep it for awhile just in case.

But you should definitively restore the Developer Options to their original settings:

  • Root access: Apps only
  • USB debugging: OFF (unticked)

And switch OFF the Developer Options all together. You can unplug your phone from your computer and delete ADT bundle from it too (though I would keep it as long as the full backup file).

What worked and What didn’t

With my own experience, everything was restored but some applications authentication, no was data loss. So the approached was a success IMHO.

Some applications lost the authentication, I simply either had to request sign-in and it auto-magically found the account information again (e.g. Firefox Sync) or to request sign-in and fill in my login and password again.

Regarding specifically Google’s 2-step verification and the Google’s Authenticator app, the configuration of this application was not restored, but via Google Account’s Security I was able to set it up again in no time, which has invalidated the previous configuration at the same time. So perfect restoration with this extra step.

Conclusion

My phone is now unecrypted, which is sad, but on the other hand I can use it again. It is now reasonably fast again that I can use applications and browse the web on the go. CyanogenMod 10.2 is a great update, the phone feels more responsive and as definitively more battery life (recharging it every 48h instead of every 36h).

64-bit architecture myths

I should start a video serie “fun with flags 64-bit theories”, but for now I will stick with only this short article. Here is the ironic part:

“There’s no shortage of pundits and self-described experts asserting that Apple’s shift to a 64-bit architecture is either a hoax, a pointless marketing ploy that will deliver no real benefit, or an inevitable shift that everyone will eventually follow anyway at some point, and therefore neither newsworthy nor deserving of any credit.” – for Apple Insider, Daniel Eran Dilger

The journalist then went on citing several Apple statements out of the iOS development guidelines. Considering those statements as true because aimed at developers. I guess that should be viewed as scientific proof ;-) You can read the full article though, it is not all bad, and better than many others I have recently read on the subject. But up to now, the most accurate comments on the new 64-bit ARM CPU for Apple’s iPhone 5s is from Anand. One of those statement is:

“When all apps running on the device are compiled for the 64-bit runtime, iOS never loads the 32-bit versions of those libraries, which means that the system uses less memory and launches apps more quickly,” – Apple

This is slightly marketing terms. A 64-bit apps is likely to use more memory than the same 32-bit counter part, most basic data types have had their size increased. But this is true that the 32-bit stack does not need to be loaded. There is an engineering trade-off to make per app: does the gain in memory consumption when switching to 64-bit exceeds the 32-bit stack footprint? But the author does not get that point and conclude that:

“The company also outlines why it will be beneficial for third party apps to release 64-bit versions of their titles for users, even if those apps don’t in themselves score massive gains from the move to 64-bits: the key result will be lower memory use for the end user.” – for Apple Insider, Daniel Eran Dilger

Lower memory use for the end user when 3rd party apps release 64-bit apps? That would be astonishing. If all 3rd party apps were 64-bit then there is no need for 32-bit stack, but I guess this stack represents a fraction of the overall available/used memory. Apple is also recognising this drawback of 64-bit systems as they state later on:

“Because so many fundamental types have increased in size, the 64-bit version of your app uses more memory than the 32-bit version does. (…) Expect to spend more time optimizing the performance of the 64-bit version of your app.” – Apple

But this is something the journalist blatently ignore.

Note: Moving from 32-bit to 64-bit does not mean you need twice the amount of memory. Not all data types have their size doubled, and apps can be refactor to use less demanding data types.

Then the stunt on the 64-bit memory model (either LP64, LLP64 or ILP64) is also a funny one. Really who cares unless you are a developer which has to use binary data or which needs to optimise an app for memory usage? Unix decided long ago to go the LP64 way (although I do not think all Unix flavour did follow it) after evaluation (performing a trade-off) severa criterias including portability, interoperability or performance. And Windows decided to go the LL64 way, which is not bad either. And regarding performance differences between those models, it only affects the memory pressure and depending on the application this can have no impact or some performance hit. And in this regard, Microsoft choices for Windows would limit the memory pressure when directly recompiling a 32-bit apps for 64-bit.

I am not going on to talk about the journalist speculations on Android move to 64-bit with its engineering and business chalenges. I fully agree that moving to 64-bit has its challenges, and then moving the apps ecosystem is another challenge of its own. But I do not think that moving the core of Android, including Dalvik, to 64-bit is as difficult as the author is implying at least from a pure technical stand. But like him, this is my gut feeling and I have nothing to base this statement on! Hence, I won’t talk about it.

Overall, this journalist, Daniel E. Dilger, is doing a better jobs than many other before him regarding the 64-bit transition which Apple is trying to do for its mobile ecosystem. But this article is clearly biaised towards Apple and in order to be so, the journalist has taken many shortcut and wrongly understood statements made for developers (not journalists!).

Note: I love Apple since many years, I have a MacBook and an iPad (and an iPod lying somewhere). But I am pationate about Linux since almost its inception, and thus I do have an old computer and several VMs running it. I also have an Android phone since recently. The only OS which I do not stand but forced to use (only for work) is Windows. So with this context in mind, I guess my opinions above are rather objective.

Continue reading “64-bit architecture myths”

Home Server – What do I want?

What service do I want to run on my Home Server?

I do have a NAS already which has the following services: File Sharing (Samba, AFS and NFS), Media Streaming Server (DLNA), VPN Server, Cloud Sync Repository. So I do not intend to have redundant services on my Home Server. What is left?

My Home Server could support:

  • Backup: Having a proper backup of all important files from the NAS and our laptop. Implementations: rdiff-backup, Box Backup, fwbackups*, duplicity*, rsnapshot or storeBackup.
  • (N)-IDS: As I have services open to the internet, I want to take some precautions and check that no exploits is taken advantage of. I am not sure this is enough, but it is the least I can do. Implementations: AIDE or Suricata.
  • DNS cache/server: I am thinking of hosting my own DNS server to perform some caching and hopefully enhance a bit the browsing experience in terms of performance. Though I would need to benchmark this to make sure I have any gain as I suspect my old router to do some caching. Implementation: dnsmasq.
  • DHCP server: My home router is a Netgear WG614 and its features for what concern DHCP are fairly limited, having my home server addressing this issue is a nice idea (until we get a better router). I could be even tightly coupled with the DNS server (see earlier bullet point) so that one could use hostname within the local network. Implementation: dnsmasq.
  • Syslog server
  • Maybe – ownCloud: maybe one day I would prefer to use an open source solution for Cloud Sync rather than the closed source one from my NAS vendor.

*: FreeBSD support is uncertain.

As one can see, I could use Linux or BSD based OS or a mixture. However, ZFS is so compelling that I am seriously considering to go for FreeBSD+jails and basta cosi! February will be the month where I try to set-up a FreeBSD server.

My Future Home Server – Part 2

I am experimenting with different OS to find the right settings for my Home Server. I was interested by Fedora especially because there are several “Red Hat” technology which I would like to use on my server, namely: oVirt and virt-manager. Furthermore it sports a recent Linux Kernel (3.7 as of this writing) which could be beneficial if I choose Btrfs for the underlying file system.

However, testing the upgrade path from Fedora 17 to Fedora 18, I am not so thrilled by the robustness of this OS. I have managed after painfully hitting 3 different blocking bugs to recover from the upgrade and have a nice Fedora 18 up and running. But this gave me little trust in the Q&A of the community. It seems that it is not the first time such problems happen (see Fedora 11).

I am still willing to give a go to Fedora. But out of precaution, I am going to experiment first with Ubuntu (for which I had since 2006 only once an upgrade problem). I want to see the state of oVirt and virt-manager on this OS before I am making any choice.

Or maybe I forget entirely about Linux based OS, and I go for FreeBSD with several jails instead of using virtualisation. Though I would need to check the state of technologies like ownCloud, (n)IDS, etc. on this OS.

My Future Home Server – Part 1

I have finally my Home Server built, it has its first storage hard drive and I upgraded the memory to something decent. Time to install the operating system.

I am not yet fully decided which operating system to implement on my Home Server, I would love ZFS as a file system for managing my storage, but I would still want to use Linux and not make the full switch to BSD. I decided to go for Fedora as the main OS, and install BSD in a virtual machine and see how this setup performs.

I had tried for a few month Fedora 17 in a virtual machine, I liked it, although I prefer the Debian package manager over yum, but this is really based on my own feelings and not on technical grounds.

So let’s go and install Fedora 18 (just released) on my server.

Continue reading “My Future Home Server – Part 1”

ZFS on Linux

In my previous post, I was stating that ZFS on Linux was not mature enough. The native ZFS port to Linux, although active, is still in release candidate stage and requires significant work to install. As for the ZFS FUSE version, it is still a 0.7 version not updated for long but it is easy to install on Ubuntu as it is available in the Software Centre (the link only works if your system supports the ‘apt:‘ scheme like on Ubuntu).

I have tried and installed the later, and although I cannot give any conclusion from a stability/reliability point of view, I was able to perform successfully the same steps I had performed on FreeBSD using ZFS.

Btrfs – Linux answer to ZFS

Sadly ZFS on Linux is not at the same maturity level than on FreeBSD (or even Solaris). There is a FUSE implementation but it is now more than 16 month since anything happen there, and in my opinion not yet stable. Regarding native ZFS port, only one ZFS implementation for Linux is still developed by the Lawrence Livermore National Laboratory but it is still a release candidate version.
The state of ZFS on Linux is perhaps not too good today, but there is another file system in development and good support that could soon compete with ZFS, its name is btrfs (pronounce ‘butter-fs‘). Btrfs is still experimental
Yesterday, one of my virtual machines running Oracle Linux 6.3 got its root file system full, as it was configured with LVM it was not so much trouble but I wanted to try btrfs. I decided to move the /var to another partitions using btrfs. I have created a new hard disk in my VM and started it. Here is the rest of the story.

Warning: following these instructions might break your system. As an advice, create a virtual machine and experience with it before doing so on a real system.

Continue reading “Btrfs – Linux answer to ZFS”

SSH goodies

Today I stumble upon an article regarding SSH on Oracle’s blogs.

One interesting feature I did not know is the SSH escape character ‘~’. So many times I had to open another terminal just to do one command locally before returning to the SSH session. Now this is over, just type ~^Z (a tilde followed by Ctrl-Z). Example

malmur :: ~ » uname -a
FreeBSD malmur 9.0-RELEASE-p3 FreeBSD 9.0-RELEASE-p3 #0: [...]
malmur :: ~ » ssh 192.168.78.10
unbreakable :: ~ » uname -a
Linux unbreakable.linux 2.6.39-200.29.1.el6uek.x86_64 #1 [...]
unbreakable :: ~ » ~^Z [suspend ssh]
[1]  + 2540 suspended  ssh 192.168.78.10
malmur :: ~ » fg
[1]  + 2540 continued  ssh 192.168.78.10
unbreakable :: ~ »

Securing ZFS data by mirroring them

This article is a follow-up of an earlier post about ZFS on FreeBSD. We have created a ZFS pool with one disk and put some data on it. Now we want to mirror the data to safeguard them from disk failure.

In my virtual machine I created a new disk of the same size than previous ZFS dedicated disk and fire-up the machine.

Creating a dataset with 2 internal copies for each file

But before I added the second disk, I decided to create a dataset (of the file system type) inside the pool I have created in previous article. The dataset will be configured to replicate internally the data for safety. This is an entirely optional step which I did just to experiment with ZFS.

The reader should notice that my pool had only 1 drive which means that each file in this dataset will appear twice on the same drive. If the drive fails, everything is lost. It just help if one version of the file gets corrupted, ZFS will detect it and use the (hopefully) uncorrupted copy to restore the file.

# zfs create -o copies=2 laug/safe

Note about: mirror/striped pools and dataset copies

Dataset copies are in addition to any pool configuration such as mirroring or RAID-Z. In case of a stripped pool (the case if you use zpool add command), ZFS will try to use different disks in the pool for each copy, if it can! In case of mirrors (the case if you use zpool attach command) or RAID-Z, in addition to the pool duplication of data, ZFS will try to keep extra copies on different drives.

Preparing the second ZFS drive and adding it as a mirror to the existing pool

As the hard disk is exactly of the same size (same disk space and number of sectors) I can reuse the commands from the previous articles:

gpart create -s gpt ada2
gpart add -b 2048 -s 41932733 -t freebsd-zfs -l disk01 ada2

But now we are going to add the new disk to the existing pool in a mirror configuration. For this we use zpool attach:

# zpool attach laug ada1p1 ada2p1
# zpool status
  pool: laug
 state: ONLINE
 scan: resilvered 1.37M in 0h0m with 0 errors on Tue Jul 31 18:16:43 2012
config:

        NAME        STATE     READ WRITE CKSUM
        laug        ONLINE       0     0     0
          mirror-0  ONLINE       0     0     0
            ada1p1  ONLINE       0     0     0
            ada2p1  ONLINE       0     0     0

errors: No known data errors

As I don’t have much data on my pool, the resilvering was fast (see the scan message). In addition, one can see that the 2 disk partitions are now inside a mirror.

I really like ZFS, the command line interface is clean, it is easy to manage and it is powerful.

ZFS on FreeBSD 9

I have created a VM with 2 hard disks. Did a standard installation of FreeBSD on the first hard disk (ada0) and decided to play around with ZFS on the second hard disk.

First of all, I destroyed any existing partitions on the second disk (warning the next command is dangerous, it will destroy all the data on the hard disk):

# gpart destroy -F ada1

I then went on to create a ZFS partition and pool. Note: I did not use the full disk size, in case I want to switch to RAID*. A prerequisite for ZFS in this case is that any newer disk should be at least the same size of the existing ones. This is not guaranteed by hard disk manufacturers that two 2TB hard disks have the same exact size.

# gpart create -s gpt ada1
# gpart show ada1
=>      34  41942973  ada1  GPT  (20G)
        34  41942973        - free -  (20G)
# camcontrol identify ada1
...
protocol              ATA/ATAPI-6 SATA 2.x
device model          VBOX HARDDISK
...
sector size logical 512, physical 512, offset 0
DMA supported         WDMA2 UDMA6

The 2 last commands gave me the partition size and sector size (in bold). I use this information to leave a bit of space after the ZFS partition. In addition, it is recommended to try to align the partitions to the sectors correctly. When using a physical hard disk for which you know the real sector size (note: sometimes the hardware is lying to you, which is the case of the 4K 512e HDD!!) you can directly use the corresponding alignment (i.e. 512 or 4k), but when using virtual HDD either as files (e.g. vdi, qcow2, etc.) or partitions (e.g. an LVM logical volume), it is better to use a 1MB aligment (1m), so adapt the “-a” option in the following command.

# gpart add -b 2048 -s 41932733 -a 1m -t freebsd-zfs -l disk00 ada1
ada1p1 added
# gpart show ada1
=>      34  41942973  ada1  GPT  (20G)
        34      2014        - free -  (1M)
      2048  41932733     1  freebsd-zfs  (20G)
  41934781      8226        - free -  (4.0M)

# zpool create laug ada1p1
# zfs set compression=lzjb laug
# zpool status
  pool: laug
 state: ONLINE
 scan: none requested
config:

        NAME        STATE     READ WRITE CKSUM
        laug        ONLINE       0     0     0
          ada1p1    ONLINE       0     0     0

errors: No known data errors
# df -Th
Filesystem   Type     Size    Used   Avail Capacity  Mounted on
/dev/ada0p2  ufs       18G    2.6G     14G    15%    /
devfs        devfs    1.0k    1.0k      0B   100%    /dev
laug         zfs       19G     31k     19G     0%    /laug

Et voilà, a nice ZFS pool which is using compression (lzjb algorithm).