Ubuntu Core – Atomicity rough on the edges

View of a Harbour Terminal before Containers existed
Before the invention of containers, docker was a much more manual job. And that’s what I’m looking for my Raspberry Pi.

I’ve been recently trying to play with Ubuntu Core on my 2nd Raspberry Pi 2. I like the concept of a minimalist host with atomic updates and the possibility to run my services inside containers. In addition, snap looks like an interesting package system (and more than that). But this setup does not fit my use cases, it is perfect for repeatable testing and safe environment for deployment. However I need a system that is stable and safe, but which I can tinker with (modify a specific configuration or kernel in order to optimise its use or detect new devices) and which grow organically (depending on my free time).

Introduction to Ubuntu Core

So Ubuntu Core (or the Project Atomic) do appeal to me but they are too restrictive for my use cases. I need more freedom. Anyway, for those of you who could be interested in these projects here is a quick review of these systems with respect to day-to-day use as I’m not going to explain the philosophy of Core/Atomic neither of snap/atomic technologies.

Both Ubuntu Core (armhf variant) and CentOS Atomic Host (x86_64 variant) felt a bit rough and despite carrying the respective name Ubuntu and CentOS I had to reconsider how I am used to administer such boxes. A basic concept is that you install a core (or minimalist) OS and you cannot pretty much change it (most parts are read only), but it should have everything to run containers. For Atomic Host, there is no way to install additional packages, you need to add every other bit of software as a container. The big difference with Ubuntu Core is that you have snaps which allows to extend the core OS without having to install and configure containers manually. A snap package – once installed – feels more or less like if you just installed a deb package. But there is a big difference, they are like little containers or sandboxed process(es) already neatly packaged so they feel like a normal command, but a lot is going on behind the scene. Here is an example, I’ve installed `htop` on my Raspberry Pi 2, now I get two distinct results if I run it with a standard user or with the super user rights, a behaviour uncommon on a standard Linux installation:

Standard User Super user

Snap htop - standard user
Snap htop – Standard User

Snap htop - super user (via sudo) - see complete list of processes
Snap htop – Super User (via sudo)

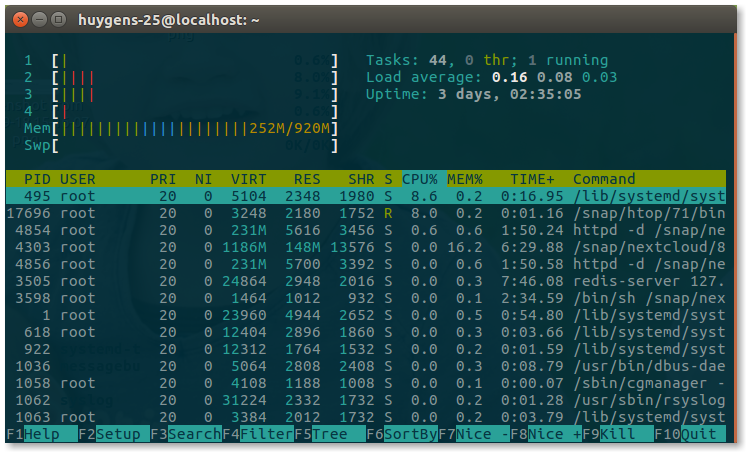
As it is visible in the case of htop, by default when I run it, htop shows only processes where the owner is myself. This is not bad but it is different from traditional Linux distribution and so you need to get the habit to do `sudo htop` to see all processes, but take care you then run htop as super user, and htop allows you to kill processes, so be careful.

However, on Raspberry Pi (and probably other ARMv7 (aka armhf) platforms) there is a very limited amount of snap packages available yet. It is probably changing fast, but if you run today Ubuntu Core 16 you can’t install much snaps and need to rely on Docker containers for adding extra applications to the base system (more on that later, including its current limitations).

Basic system configuration absent

Let’s get back to the beginning and I mean by that right after the installation of Ubuntu Core upon first boot. I still had my keyboard and screen attached to it (and you need it in order to login with your Launchpad SSO login to create the first user). After the first boot, I was not offered the possibility to change the keyboard layout (I do not have a US layout) but at least on Ubuntu Core one can change it afterwards by editing the file `/etc/default/keyboard`, this feat is not possible on Atomic Host. Anyway, not such a big issue as I’m using my Raspberry Pi mostly (if not alway) via SSH then it does not matter anymore. Staying on the localization topic, both systems do not allow changing the locale (language, regional preferences, etc.). On Atomic Host it is set to US with the “peculiar” time and date format ;-) no offense! Similar fate on Ubuntu Core but they are using the C locale (which sadly for me also uses the US date/time format). Although I would anyway stick to the English language, I don’t like the regional choice and I don’t like the lack of choices here.

So let’s move back to an SSH connection, at least the keyboard layout is no longer an issue. But here comes the next one ;-) whenever I use SSH, the first thing I do is launch a new tmux session or attach to an existing one. I’m open to other solutions, so if the host only has screen or byobu, I’m also fine. However, Ubuntu Core for ARMv7 does not ship by default with any of them, nor are they any existing snap package. So there is no simple way (out of compiling from source and creating a snap package) to have safe SSH session.

Docker

Normally thanks to container technology, it is possible to install more or less everything I would need and with some clever alias it would seem much like a snap installation. So I just wanted to create a Dockerfile which reference Alpine Linux and install tmux and build the container using Docker. Not possible with Ubuntu Core and the Docker snap. According to the Docker snap information, I should be creating a folder under `$HOME/apps/docker/1.6.xxx` (eventhough Docker 1.11.2 was installed, weird), but it does NOT work. The AppArmor profile installed with Docker snap denies it. I’ve tried many different folders to no avail. This is not a misconfiguration of Ubuntu Core but rather one of the Docker snap packager, but the end result is that as a user Ubuntu Core on armhf is barely usable (lack of too many essential tool, no snap and cannot easily use Docker).

Other rough edges with Docker are that your default user does not belong to the Docker group, so you need to sudo every single Docker command. There is also no way to add yourself to the Docker group (as the group is defined in the standard file `/etc/group` which is on a read-only filesystem). Your default user is also not a real traditional user, it is an “extra user” (did not know this subtlety before this) so there are a bunch of things that are not compatible with it like you cannot launch a container to run as yourself (docker run -u $(whoami) ...) as you are not a standard user (no entry in `/etc/passwd`), you are an extra users (see in `/var/lib/extrausers/passwd`), but at least it would be possible to do it specifying your user ID (e.g. 1000)! This is all logic but “rough”. A corollary to the previous statements is that you cannot run Docker in user namespaces mode (unprivileged Docker container) as you cannot add yourself to the Docker group.

At least the Docker snap includes Docker Compose, that is cool. On Atomic Host, Docker is installed but not Docker Compose. As the file system is also read-only there is good way to install Docker Compose in a central place, it should be run within a container. At least on Atomic Host, it is very easy (as on standard Linux OS) to create Dockerfile and build them. So these limitations (of not having Docker Compose and some other tools) can be overcome with some efforts.

Final Try

My next steps was to download some scripts and tools. However both curl and wget are absent of the base installation. Even git is not available as a snap or on the core installation. There is no way to build a Dockerfile, so in the end to have tmux, curl, git, etc. I had to create a lxd container running Ubuntu just to get a normal OS (or from my laptop, I could download the scripts and via scp pushing them to Ubuntu Core). But then I simply prefer to run Ubuntu Server or Raspbian on my Raspberry Pi.

For me I’ve lost too much time on this already. Ubuntu Core seems nice I really like the principles and approach, but it is definitively missing too many basic tools, too rough for my taste and available free time.

Conclusion

I will install Ubuntu Server or CentOS 7 for armhf on my second Raspberry Pi 2. Ubuntu Core is perhaps still a bit too young (maybe it is specific to the armhf platform) and requires too much work for my needs. At least this experience made me understand that I don’t want a lock down and safe box, but I need flexibility.

Picture credits: Public Domain. The picture is part of the State Library of South Australia collection (see original B 4433 photo).

Getting docker-compose on Raspberry Pi (ARM) the easy way (updated)

I really like docker-compose, it has a simple language (YaML) to describe how to build and run a container, so you do not have to remember (or count on your history availability) the long `docker build ...` and `docker run ...` commands (and many others).

However, docker-compose is not (yet) available for Raspberry Pi or any other ARM architecture.

(Update 2017-03-02: but we are getting there. A first series of patches to allow support has been merged in the master branch but is not yet released. However, it does not look like official releases of compose for ARM will be provided in the near future, but at least building them will become even easier.)

(Update 2019-03-24: it is now easily available using pip. Doing pip install docker-compose works on ARM.)

So I forked the official Docker Compose repository and did a few minimalistic changes in order to get a built of docker-compose for Raspberry Pi. I have created a Pull Request in the hope that it might get accepted and that ARMv7 be officially built. But while waiting for the review process to be triggered, here is how to do it for yourself.

Download the Project

As pre-requisite you need to have `git` (sudo apt-get install git) and `docker` (see my previous article) already installed on your platform.

Then get a copy of the project on your local Raspberry Pi.

$ git clone https://github.com/docker/compose.git
$ git checkout release

Now apply the following patch (Update 2017-03-02: soon when the master branch will be merged into the release one, these extra steps won’t be necessary):

$ cd compose
$ cp -i Dockerfile Dockerfile.armhf
$ sed -i -e 's/^FROM debian\:/FROM armhf\/debian:/' Dockerfile.armhf
$ sed -i -e 's/x86_64/armel/g' Dockerfile.armhf

Build and install docker-compose

To build the docker-compose binary, the procedure is rather simple. First you need to build the docker image which will be used to set-up the build environment. Second and last you need to run the container which will build docker-compose. At the end the binary will be available under the `dist` subfolder.

$ docker build -t docker-compose:armhf -f Dockerfile.armhf .
$ docker run --rm --entrypoint="script/build/linux-entrypoint" -v $(pwd)/dist:/code/dist -v $(pwd)/.git:/code/.git "docker-compose:armhf"

After several minutes you will get a binary file which you can then install on your system:

$ ls -l dist/
total 6816
-rwxr-xr-x 1 pi pi 6976500 Feb  8 11:41 docker-compose-Linux-armv7l
$ sudo cp dist/docker-compose-Linux-armv7l /usr/local/bin/docker-compose
$ sudo chown root:root /usr/local/bin/docker-compose
$ sudo chmod 0755 /usr/local/bin/docker-compose
$ docker-compose version
docker-compose version 1.11.0-rc1, build daed6db
docker-py version: 2.0.2
CPython version: 2.7.13
OpenSSL version: OpenSSL 1.0.1t  3 May 2016

Goodies: Install docker-compose bash autocompletion

Docker Compose provides autocompletion for bash. Installing it is as simple as doing:

$ sudo curl -L https://raw.githubusercontent.com/docker/compose/$(docker-compose version --short)/contrib/completion/bash/docker-compose -o /etc/bash_completion.d/docker-compose

Conclusion

If you might wonder why I stated “the easy way” in my title, well if you want to master Docker, you ought to consider the above easy :-)

Of course in our field of work nothing is as simple as a mouse click, especially when you need to create something that is not (until today) provided out of the box. If you want real easy simply install it using pip install docker-compose should work.

Listing open sockets on Linux

Everyone knows probably the `netstat’ command already, so I will only give my favourite options with it (`sudo’ is optional here, but if you want to see the process attached to the socket, you will want to use it):

  • List all (TCP) listening sockets:
$ sudo netstat -tlpen
  • List all TCP listening sockets and all UDP sockets:
$ sudo netstat -tulpen
  • List all sockets (TCP, UDP, Unix, etc.):
$ sudo netstat -apen

Now, you may not know it, but `netstat’ is deprecated. It is still installed on most Linux distribution that I know of, but you should move to its replacement command `ss’. The good thing is that all of the above options are still working with this command for the same results, the output is however differently formatted, hence script using the output of netstat command might get broken.

$ sudo ss -tlpen
$ sudo ss -tulpen
$ sudo ss -apen

Finally because everything (or almost) is a file on Unix/Linux, you can use the `lsof’ command – which provides listing of open files – to query the list of open sockets. It is yet another method, but I like it because the output is more condensed and contains usually what I want. Thanks to Michael Crosby (@crosbymichael) for sharing his knowledge.

So the first command is listing all IPv4 TCP and UDP sockets:

$ sudo lsof -Pnl +M -i4

The next one does the same thing for IPv6 TCP and UDP sockets:

$ sudo lsof -Pnl +M -i6

The combined output of the previous commands is equivalent to the output of `sudo ss -atupen’.

Setting Shared Folder Compression on Synology NAS (BTRFS)

disk-managementIf you have a Synology NAS that supports BTRFS (mostly the intel based NASes) and that you decided to use BTRFS, there are a couple of shared folders automatically created for you (like the “homes” or “video”) but they don’t have the “compression” option set, and trying to edit the shared folder in the administration GUI does not help, the check box is grayed out, meaning it is not possible.

BTRFS compression is quite “clever”. It has some heuristics that evaluate if a file is worth being compressed or not so it won’t try to compress the 1GB video of your toddlers playing together which is a waste of time given that the compression achieved might not be visible. But anyway, even if BTRFS is “clever” it does not mean that if you have a folder named video that you should consider using compression. Simply just don’t do it.

For folders with mixed data like “homes” (which is the shared folder for all user home directory) you might have wished Synology would have activated the compression. Or if you forgot to tick the check box once creating the volume, you might want to change it. But there is a way to change that. It is not guaranteed that it won’t break your NAS, especially if you do execute the wrong command, but if you don’t mind the risk then follow on.

BTRFS allows you to change the option on a live system without troubles. However, existing data on the shared folder won’t be compressed after activating the option, you would need to copy again the existing data to take benefits for it or defragment it using the compression option (-c see man btrfs-filesystem), however depending on your amount of data this might take a while.

To do it, you will need to activate SSH remote connection (try to limit it to your local LAN and do not open it to the internet unless you know what you are doing). You will need to connect via SSH using the administrator account (admin by default, but you would be wise to change the default name). I trust you know how to activate SSH on your NAS box, if not I would recommend you don’t try to do the rest of this article, ask someone who might know it! From a Linux or macOS (OS X) system, just open a terminal and type:

$ ssh <admin>@<hostname>

(and replace admin by the correct user account and hostname by your NAS hostname or IP address)

On Windows, you could use putty and achieve a similar fate.

Once connected, you need to know your BTRFS volume path:

$ mount -t btrfs
/dev/mapper/vg1-volume_1 on /volume1 [...]

In the above example, it is /volume1. Now you should have a BTRFS subvolume (think of it as a BTRFS internal sub partition which Synology uses to define shared folders) called “homes” (or whatever other shared folder you would like to tweak):

$ sudo btrfs subvolume list /volume1
[...]
ID 259 gen 1688 top level 257 path homes
[...]
ID 264 gen 1686 top level 257 path video

So here we have made sure that the “homes” shared folder is located on /volume1/homes. Now let us check its properties:

$ sudo btrfs property get /volume1/homes
ro=false

Here we can confirm that compression is not set (note that compression was not set as a mount option, nor at the volume root). To activate is, you need to create the “compression” property, you can choose either zlib or lzo. The former compress better but is slower, the latter is fast but as much lower compression ratio. I personnaly choose lzo:

$ sudo btrfs property set /volume1/homes compression lzo

You can use again the previous command to get the properties for the volume and see if it was set. Now you can copy your files to the shared folder, and BTRFS will try to compress them if it thinks it makes sense.

Picture credits: Picture is from the KDE project. The original materials is licensed under GNU LGPLv3.

LXC unprivileged containers on Ubuntu 14.04 LTS

LXC Containers
LXC Containers

I’ve been toying around with containers using LXC, and I decided to use this technology to do some performance technique for a PHP web application. So I set-up a VM with Ubuntu 14.04 LTS and decided to use containers to test various stacks, e.g. MySQL 5.5 + PHP 5.6 + Nginx 1.4.6 vs MariaDB 10 + PHP 7 RC3 + Nginx 1.9 (and all possible combinations), and HTTP/2, latencies, etc. On top of this experiment I wanted to learn more about Ansible.

Therefore my needs were the following:

  • One account to rule them all: one user account on the VM with sudo privileges. Used by Ansible to administer the VM and its containers.
  • Run each container as unprivileged ones.
  • Each container is bound to one unique user.

As of Ansible 1.8, LXC containers are supported, but as second class citizen: this extra module needs some dependency to work (which are not in the default repositories) and it would hide me how to configure the LXC containers, so I discarded this solution.

Unprivileged containers using the LXC command line UI

Standard containers usually run as root and the root user within that container maps to the root user outside of the container. This is not exactly how I think of a container.

Real Container
Real Container

In my view, a container is meant to hold something which I don’t want to leak out of the container, a chroot on steroids! So although I was really looking forward for containers on Linux, the first implementation were not matching my expectations or use cases.

Being able to run unprivileged containers is one of the great thing which finally decided me to check those containers on Linux, they finally cut the mapping between the privileged users on the host and those in the container.

Unprivileged containers are not as easy to set-up as normal fully privileged containers and you have to accept that you need to download an image from some website you need to trust. Not ideal, but resources about how to build an image for an unprivileged container are really scarce online, and I decided to first try it with the images, and then once I master LXC, to try building my own images.

Setting up LXC unprivileged containers require a few more packages, especially for the user and group IDs mapping, some preliminary account setup and giving LXC proper access to where you store the LXC containers data in your home folder. I did all of this, including setting up ACLs for the access. But when I hit lxc-start (...) it all failed!!!

Container_Failuer
Container in Distress

What I did after all preliminary configurations was:

$ sudo -H -u dbusr lxc-create -t download -n mysql55 -- --dist ubuntu --release trusty --arch amd64
$ sudo -H -u dbusr lxc-start -n mysql55 -d
lxc-start: lxc_start.c: main: 344 The container failed to start.
lxc-start: lxc_start.c: main: 346 To get more details, run the container in foreground mode.
lxc-start: lxc_start.c: main: 348 Additional information can be obtained by setting the --logfile and --logpriority options

And the lxc-start command failed miserably.

Why? A bit of background first, I will try to describe at a high level how containers “contain” on Linux. LXC should not really be compared to Solaris Zones or FreeBSD Jails. LXC uses Linux Control Groups (cgroups) to contain (allow/restricting/limiting) access by some process to some resources (e.g. CPU, memory, etc.). When one creates a “local” session on Ubuntu 14.04 LTS (and this is still valid on the up-coming Ubuntu 15.10 as of writing), such as login through the console or via SSH, Ubuntu allocates for the user different control groups controllers which can be viewed by doing:

$ cat /proc/self/cgroup
12:name=systemd:/user/1000.user/4.session
11:perf_event:/user/1000.user/4.session
10:net_prio:/user/1000.user/4.session
9:net_cls:/user/1000.user/4.session
8:memory:/user/1000.user/4.session
7:hugetlb:/user/1000.user/4.session
6:freezer:/user/masteen/0
5:devices:/user/1000.user/4.session
4:cpuset:/user/1000.user/4.session
3:cpuacct:/user/1000.user/4.session
2:cpu:/user/1000.user/4.session
1:blkio:/user/1000.user/4.session

Each line is a type of control group controller assigned to the user. For example the line about memory concerns the Memory Resource Controller which can be used for things such as limiting the amount of memory a group of process can use.

So when I run my script via Ansible, Ansible first establish a SSH session using my “rule-them-all” user, an SSH session is considered “local” and PAM is triggering systemd-logind to create automatically cgroups for my user shell process. Yes, even-though Ubuntu 14.04 LTS is still using upstart for init system, it has already a few dependencies on systemd! Now my “rule-them-all” user, when he is using sudo to execute commands as another user (be it root or one of my container users), the executed command is not considered as a “local” session for the sudo-ed user. So no cgroups are created for the new process, and it actually inherit the cgroups of the callee. This is easily visible by doing, you can see that the username and UID did not change despite the command being run as another user:

$ sudo -u userdb cat /proc/self/cgroup
12:name=systemd:/user/1000.user/4.session
11:perf_event:/user/1000.user/4.session
10:net_prio:/user/1000.user/4.session
9:net_cls:/user/1000.user/4.session
8:memory:/user/1000.user/4.session
7:hugetlb:/user/1000.user/4.session
6:freezer:/user/masteen/0
5:devices:/user/1000.user/4.session
4:cpuset:/user/1000.user/4.session
3:cpuacct:/user/1000.user/4.session
2:cpu:/user/1000.user/4.session
1:blkio:/user/1000.user/4.session

This usually does not really matter, unless you are LXC and you use cgroups heavily!! So what happened is that lxc-start wanted to write to the various cgroups to create the container. But lxc-start was called by the user dbuser (via the sudo command), however the cgroups it inherited were from my “rule-them-all” user and obviously (and thankfully) dbuser does not have the right to change the cgroups of my “rule-them-all” user. So lxc-start failed due to some permission denied:

lxc_container: cgmanager.c: lxc_cgmanager_create: 299 call to cgmanager_create_sync failed: invalid request
lxc_container: cgmanager.c: lxc_cgmanager_create: 301 Failed to create hugetlb:mysql55
lxc_container: cgmanager.c: cgm_create: 646 Error creating cgroup hugetlb:mysql55
lxc_container: start.c: lxc_spawn: 861 failed creating cgroups
lxc_container: start.c: __lxc_start: 1080 failed to spawn 'mysql55'
lxc_container: lxc_start.c: main: 342 The container failed to start.

Getting Ubuntu 14.04 LTS ready to run our Unprivileged Containers

I did not manage to solve the problem on Ubuntu 14.04 LTS in a first attempt. But after some extra steps (which I will details below), I made it work on the up-coming Ubuntu 15.10 (still alpha) release! So revisiting my Ubuntu 14.04 LTS setup, I identified the required packages needing an upgrade: kernel, lxc and cgmanager (and a few dependencies). For the Kernel, I’ve used the latest Ubuntu LTS Enablement Stack and upgraded to kernel 3.19. For the other packages, despite my aversion for 3rd party repositories, I decided to trust the Ubuntu LXC team (they are the ones who do the work to get LXC/LXD in Ubuntu in the first place) and their LXC PPA. So the commands were:

$ sudo apt-get install --install-recommends linux-generic-lts-vivid
$ sudo apt-add-repository ppa:ubuntu-lxc/lxc-stable
$ sudo apt update
$ sudo apt full-upgrade
$ sudo apt-get install --no-install-recommends lxc lxc-templates uidmap libpam-cgm

The lxc-templates package are necessary for me as I’m using the “download” template. The uidmap is mandatory for unprivileged containers. And libpam-cgm is necessary to resolve my problem, it is a PAM module for the cgmanager which is the Control Group Manager daemon (installed as a dependency to LXC on Ubuntu).

Now armed with this updated kernel and container stack it is time to present you the extra setup steps I was talking about. We need first to update either (or both depending which method you use) the PAM configuration for sudo or su. I will show the extra line for the former, they should apply for the later if you wish to use it. You need to edit as root the file /etc/pam.d/sudo and add the following lines after the line ‘@include common-session-noninteractive‘:

session required pam_loginuid.so
session required pam_systemd.so class=user

The above 2 lines will register the new session created by sudo with the systemd login manager (systemd-logind). That’s the guy we wanted notified so that the creation of the cgroups for our user can now work. I’m still scouring the internet for the exact explanation of how this work. If I find it, I will probably write another post with the information.

If I would simply use su -l userdb or sudo -u userdb -H -s, I would just have to execute the following:

$ sudo cgm create all $USER
$ sudo cgm chown all $USER $(id -u) $(id -g)
$ cgm movepid all $USER $$

This will create all cgroups under the user $USER which is userdb. It will then set the owner of these new cgroups to the UID and GID of the userdb. And the last command move the SHELL process ($$) within these new cgroups. Then, the rest is trivial:

$ lxc-start -n mysql55 -d

And it is working. And if you want to run those commands using sudo, this is how you do it:

$ sudo -H -i -u userdb bash -c 'sudo cgm create all $USER; sudo cgm chown all $USER $(id -u) $(id -g)'
$ sudo -H -i -u userdb bash -c 'cgm movepid all $USER $$; lxc-start -n mysql55 -d'

If you close later the SSH session and you reconnect to it, you have to run the 2 commands again, even though it might display some warning that the paths or what-not are already existing. I still have those pesky warning and extra commands which I’m not sure why I still have.

Conclusion

While trying to run unprivileged containers on Ubuntu 14.04 LTS I’ve met several problems which I could only solved by using the latest LXC and CGManager packages and some special PAM configuration for which I’m not 100% sure of the impact. So unprivileged LXC containers on Ubuntu 14.04 LTS is still quite rough.

But during my journey with LXC, I’ve found an even easier way to create unprivileged LXC containers, without touching PAM, but still requiring the latest LXC and CGManager packages. This solution is based on LXD, the Linux Containers Daemon. There is a really good getting started guide by Stéphane Graber, the man behind LXD. I’m exploring this avenue at the moment and will report soon on this very blog.

All of this make me really look forward to the next Ubuntu LTS due to next Spring, the newer LXC and the under-heavy-development LXD will be part of Ubuntu 16.04 LTS and this could give a really great experience out-of-the-box with Linux Containerisation powers.

Picture credits: LXC Containers is based on a Public Domain photo of an unknown author. Real Container by Petr Brož, licensed under CC BY-SA 3.0 via Wikimedia Commons. Container in distress is licensed under a CC-BY 2.0 license by the New Zealand Defence Force.

Linux and AVM Fritz!Wlan USB Stick N v2

USB-Wireless-DongleI bought a USB Wireless dongle from AVM called Fritz!Wlan USB Stick N v2. The wireless chipset of this dongle is usually Ralink RT5572 (this device has had a few revisions, hence the v2 should be this Ralink chipset) which is supported under Linux by the rt2800usb module.

This dongle is particular, it is first seen as a CD drive. This is meant for Windows users so that the system will automatically install the correct driver, eject the CD and then transform itself into a Wireless dongle. On other platform, it also shows up as a CD drive, if you eject it (automatically or manually) it becomes a Wireless dongle.

Once you plug it, you can view it on Linux directly running: lsusb -d 057c:. However depending on your version of Linux, it might shows as a CD, broken, or potentially in the future as a Wireless device.

On Debian Wheezy, it was seen as a CD drive. A simple manual eject command and it is working. Slightly annoying, but fine.

On Debian Jessie (which uses systemd) and on Fedora 22 (also using systemd), the device is not mounting as a CD not as a Wireless dongle. So you can’t use it.

I don’t know why, but there is a package (already installed on both distribution by default) named usb-modeswitch which tries to be clever and detects USB devices like the one from AVM and do automatically for you the necessary kirks to make it work as intended. It seems that an Wheezy, it was not triggered. But on Jessie and Fedora 22, it was triggered but wrongly configured.

I have the solution which work flawlessly on both distributions and will allow you to just plug your USB dongle and see it as a wireless device (as expected! Thanks AVM x-( )

You either need to create or modify the file /etc/usb_modeswitch.d/057c:62ff so that it contains exactly the following text:

# AVM Fritz!Wlan USB Stick N v2
TargetVendor=0x057c
TargetProductList="8501,8503"
StandardEject=1
NoDriverLoading=1
MessageContent="5553424312345678000000000000061b000000ff0000000000000000000000"

On Debian Jessie, this file did not exist. Adding solve the problem!

On Fedora 22, this file existed but the last line was missing. What this line is meaning is beyond my understanding. But it is taken from the creator of the usb-modeswitch tool. He has a reference file with many USB devices and solutions. The AVM USB wireless dongle is in there, and that’s where the line come from.

Side note: this device is pretty cool if you need to do advanced wireless stuff. For example, it is possible to build a WiFi rogue AP detector with this device and some tools.

Picture credits: Picture was created by me using elements from the KDE project. The original materials were licensed under GNU LGPLv3, and the picture is also provided under this license terms and conditions.

An Unpredictable Raspberry Pi

Critical Miss! by Scott Ogle, CC BY-SA 2.0
Random Number Generator – Photo by Scott Ogle, CC BY-SA 2.0

Our computers are not really good at providing random numbers because they are quite deterministic (unless you count these pesky random bugs that make working on a computer so “enjoyable”). So we created different ways to generate pseudo-random numbers of various qualities depending on the use. For cryptography, it is paramount to have excellent random numbers, or an attacker could predict our next move!

Getting unpredictable is a difficult task, Linux tries to provide it by collecting environmental noise (e.g. disk seek time, mouse movement, etc.) in a first entropy pool which feeds a first Cryptographically Secure Pseudo-Random Number Generator (CSPRNG) which then output “sanitised” random numbers to different pools, one for each of the kernel output random device: /dev/random and /dev/urandom.

Raspberry Pi Logo (a Raspberry)

Our goal is to help our Raspberry Pi to have more entropy, so we will provide it with a new entropy collector based on its on-board hardware random number generator (HW RNG).

I have already presented quickly why you need entropy (and good one), and also a quick way of having more source for the Linux kernel entropy pool for the Raspberry Pi using Raspbian “Wheezy” or for any computer having a TPM chip on board.

This article is an update for all of you who upgraded their Raspbian to Jessie (Debian 8). The new system uses SystemD for the init process rather than Upstart for previous release.

The Raspberry Pi has an integrated hardware random number generator (HW RNG) which Linux can use to feed its entropy pool. The implication of using such HW RNG is debatable and I will discuss it in a coming article. But here is how to activate it.

It is still possible to load the kernel module using $ sudo modprobe bcm2708-rng. But I know recommend using the Raspberry Pi boot configuration, as it is more future proof: if there is a newer module for the BCM2709 in the Raspberry Pi 2 (or any newer model), using Raspberry Pi Device Tree (DT) overlays should always work. DT are a mean to set-up your Raspberry Pi for certain tasks by selecting automatically the right modules (or drivers) to load. It is possible to activate the HW RNG using this methods.
Actually, we do not need to load any DT overlays, but only to set the random parameter to ‘on‘. You can achieve this by editing the file /boot/config.txt, find the line starting with ‘dtparam=(...)‘ or add a new one starting with it. The value of dtparam is a comma separated list of parameters and value (e.g random=on,audio=on), see part 3 of the Raspberry Pi documentation for further info. So at least, you should have:

dtparam=random=on

With this method, you have to reboot so that the bootloader can pick-up automatically the right module for you.

Now install the rng-tools (the service should be automatically activated and started, default configuration is fine, but you can tweak/amend it in /etc/default/rng-tools), and set it to be enable at next boot:

$ sudo apt-get install rng-tools
$ sudo systemctl enable rng-tools

After awhile you can check the level of entropy in your pool and some stats on the rng-tools service:

$ echo $(cat /proc/sys/kernel/random/entropy_avail)/$(cat /proc/sys/kernel/random/poolsize)                                 
1925/4096
$ sudo pkill -USR1 rngd; sudo systemctl -n 15 status rng-tools
rngd[7231]: stats: bits received from HRNG source: 100064
rngd[7231]: stats: bits sent to kernel pool: 40512
rngd[7231]: stats: entropy added to kernel pool: 40512
rngd[7231]: stats: FIPS 140-2 successes: 5
rngd[7231]: stats: FIPS 140-2 failures: 0
rngd[7231]: stats: FIPS 140-2(2001-10-10) Monobit: 0
rngd[7231]: stats: FIPS 140-2(2001-10-10) Poker: 0
rngd[7231]: stats: FIPS 140-2(2001-10-10) Runs: 0
rngd[7231]: stats: FIPS 140-2(2001-10-10) Long run: 0
rngd[7231]: stats: FIPS 140-2(2001-10-10) Continuous run: 0
rngd[7231]: stats: HRNG source speed: (min=824.382; avg=1022.108; max=1126.435)Kibits/s
rngd[7231]: stats: FIPS tests speed: (min=6.459; avg=8.161; max=9.872)Mibits/s
rngd[7231]: stats: Lowest ready-buffers level: 2
rngd[7231]: stats: Entropy starvations: 0
rngd[7231]: stats: Time spent starving for entropy: (min=0; avg=0.000; max=0)us

Source:

Raspberry Pi is a trademark of the Raspberry Pi Foundation.

24 – Happy Birthday Linux

I was too young to have witness this and I had never heard of the internet, e-mails or usenet at that time. But it’s amasing to look once back and see how much technology and connectivity is so much more accessible, and that this simple hobby which was Linux at that time is now everywhere, even in space!

Hello everybody out there using minix –
I’m doing a (free) operating system (just a hobby, won’t be big and professional like gnu) for 386(486) AT clones. This has been brewing since april, and is starting to get ready. I’d like any feedback on things people like/dislike in minix, as my OS resembles it somewhat (same physical layout of the file-system (due to practical reasons) among other things).
(…)
PS. Yes – it’s free of any minix code, and it has a multi-threaded fs. It is NOT portable (uses 386 task switching etc), and it probably never will support anything other than AT-harddisks, as that’s all I have :-(.
—Linus Torvalds

Installing Raspbian Headless (no screen, full network)

Changelog:

  • 2015-08: initial release
  • 2015-08: add upgrade to Jessie instructions
  • 2018-03: update instructions for Raspbian Stretch.

I’m going to explain how to install Raspbian (latest is based on Debian Stretch, dated 2018-03) on a Raspberry Pi which is only connected to the network using a Ethernet cable (of course your Raspberry Pi should be connected to a power source).

Raspberry Pi 2 Model B+ v1.1This guide should work for all Raspberry Pi supported version with an Ethernet interface (B, B+, 2, 3 and 3-B+). It could potentially work without an Ethernet interface if you have a WiFi USB dongle or a Raspberry Pi with an integrated WiFi which is supported out-of-the box by the RPi. I’ve tested the following on a Raspberry Pi 2 and a Raspberry Pi 3 B+. This guide assumes that you are doing all steps from a Unix machine (I’ve done them from Fedora Linux but it should work on any Linux, BSD or OS X with potential adaptation). It is possible to do it on Windows I suppose, but I don’t have Windows and can’t explain.

The steps are:

  • Flash the Raspbian image to a SD card;
  • Sync everything and mount the second partition created;
  • Modify files on the SD card to allow SSH (and optionally configure WiFi);
  • Put the SD card in your RPi and plug the power;
  • Wait a couple of minute for thing to settle;
  • Either check your DHCP server (e.g. your router) for the RPi IP address, or scan your network);
  • Connect to your RPi using SSH and finish the setup;
  • (option) Upgrade to Debian Jessie (you will have to view the full article)!

Flash the Raspbian image to a SD card

Raspbian LogoThere are already numerous guides online on how to do that. So I will be brief, but refer to those guides for your exact configuration. I assume a new SD card which has already a Windows FAT partition with a size bigger than 4GB (I recommend 16GB). When I plugged that SD card on my laptop it was recognised as /dev/mmcblk0p1 and automatically mounted. First we need to unmount this partition and then to remember the device name (without the partition suffix, so /dev/mmcblk0 in my case). Note that if you are on BSD or OS X those steps are slightly different, check online. Using the device name we can flash the Raspbian image (after downloading the zip file, check that the SHA-256 checksum match, you can either pick-up the normal or the Lite version of Raspbian, but if your goal is a headless server, then the Lite is more suitable).

$ sudo umount /dev/mmcblk0p1
$ unzip -p 2018-03-13-raspbian-stretch-lite.zip | sudo dd bs=4M of=/dev/mmcblk0 oflag=dsync status=progress
$ sync

After doing the above you should have now 2 new partitions on your SD card. The first partition (suffix p1) is the boot one and is formatted as FAT (was <60MB for me). The second one (suffixed p2) is the root partition and is formatted as ext4 (roughly 3GB). That’s the partition /dev/mmcblk0p2 which is interested for the next step.

Allow SSH access

OpenSSH LogoFor pre-systemd Raspbian releases (up to Wheezy, or Debian 7), you need to mount the second partition now, So create first a mount point and then mount the partition to it.

$ sudo mkdir /mnt/rpi
$ sudo mount /dev/mmcblk0p2 /mnt/rpi
$ cd /mnt/rpi/etc
$ sudo mv rc2.d/K01ssh rc2.d/S01ssh
$ sudo mv rc3.d/K01ssh rc3.d/S01ssh
$ sudo mv rc4.d/K01ssh rc4.d/S01ssh
$ sudo mv rc5.d/K01ssh rc5.d/S01ssh

For systemd-based Raspbian (from Jessie or Debian 8), you simply need to have the file ssh (or ssh.txt) created in the “boot” partition which is the 1st partition.

$ sudo mkdir /mnt/rpi
$ sudo mount /dev/mmcblk0p1 /mnt/rpi
$ sudo touch /mnt/rpi/ssh

That’s it!

Optional WiFi configuration

Network Wireless by OxygenOptional: if you do not have an Ethernet interface and need to use WiFi, you need to add the WiFi configuration (your SSID – or WiFi network name – and your WiFi password). Assuming you have something like WPA2-PSK, you simply need to edit the file /mnt/rpi/etc/wpa_supplicant/wpa_supplicant.conf and add the following at the end of the file:

network={
    ssid="Your_WiFi_SSID"
    psk="Your_WiFi_password"
}

The network configuration on Raspbian is set to use DHCP, so after booting the system will use whatever network interface it has available and make DHCP requests in order to get an IP address.

You will also have to specify your country code (in ISO/IEC alpha2 code, DE for Germany, US for USA, JP for Japan, etc.) by either modifying the existing line or by adding it. Here is an example for Iceland:

country=IS

The country code is mandatory (at least on recent Raspbian) in order to have WiFi activated. So you will need to set it up correctly if you want a headless installation using WiFi and no Ethernet.

Note: please don’t use both the Ethernet and WiFi interfaces if you they are both on the same network. Such a configuration is possible, but it won’t work out-of-the-box. So set up first one interface, make it work and then add the other one (look for online resources about how to configure Linux for 2 NIC on the same subnets).

Start Raspbian and connect to it

Now sync all changes to the SD card:

$ cd ~ ; sudo umount /mnt/rpi

Before removing the SD card from your computer, be sure that you properly unmounted it.

Now remove the SD card from the computer, insert it in the Raspberry Pi, plug the Ethernet cable (or the WiFi USB dongle) and then the USB power plug. The LEDs of your RPi should light up (PWR – red one – means that your power supply is good enough; ACT – green one – should not be steady green, it means your SD card is not readable or was wrongly flashed, it should blink). After the RPi has completed boot up, the ACT LED should be off (mostly), meaning that there are no more I/O activities going on. That’s when you can be sure that the RPi has sent its DHCP probes and should have an IP address assigned.

If you have a proper router which register a DNS entry for each DHCP clients, you should be able to directly login to your Raspberry Pi by doing:

$ ssh pi@raspberrypi

If you router does not support such feature, you will need to know your Raspberry Pi IP address, you can either go to your DHCP server (e.g. your router) and check which address was assigned to it, or simply scan your network. To scan your network you need to know your subnet (e.g. 192.168.1.0 with a netmask of 255.255.255.0) and have nmap installed on your computer (sudo dnf install nmap will work for Fedora, and it is as easy for Debian/Ubuntu-based distros as well, just replace dnf by apt-get).

$ sudo nmap -sP 192.168.1.0/24

Of course you need to adapt the above command to your subnet. The “/24” part is the netmask equivalent of 255.255.255.0. I recommend running the above command with sudo because it will display the MAC address of all the discovered devices which will help you spot your Raspberry Pi as nmap is displaying the vendor attached to each MAC address. See for yourself in the example output:

Starting Nmap 6.47 ( http://nmap.org ) at 2015-07-19 20:12 CEST
(...)
Nmap scan report for raspberrypi.lan (192.168.1.9)
Host is up (0.0060s latency).
MAC Address: B8:27:EB:1E:42:18 (Raspberry Pi Foundation)
(...)
Nmap done: 256 IP addresses (8 hosts up) scanned in 2.05 seconds

Now you can simply connect to your RPi by using the user pi and password raspberrypi (which are default on Raspbian):

$ ssh pi@192.168.1.9
The authenticity of host 'raspberrypi (192.168.1.9)' can't be established.
ECDSA key fingerprint is SHA256:WSF9Rpmh0Mr/JYUye8r69nXzwZtYbdH0xJ5M4AFYxYY.
Are you sure you want to continue connecting (yes/no)? yes
Warning: Permanently added 'raspberrypi,192.168.1.9' (ECDSA) to the list of known hosts.
pi@raspberrypi's password: 
Linux raspberrypi 4.9.80-v7+ #1098 SMP Fri Mar 9 19:11:42 GMT 2018 armv7l

The programs included with the Debian GNU/Linux system are free software;
the exact distribution terms for each program are described in the
individual files in /usr/share/doc/*/copyright.

Debian GNU/Linux comes with ABSOLUTELY NO WARRANTY, to the extent
permitted by applicable law.

NOTICE: the software on this Raspberry Pi has not been fully configured. Please run 'sudo raspi-config'

pi@raspberrypi ~ $

It was advised, that you run the command sudo raspi-config especially to increase the partition size so it uses the complete SD card space available. This step is however done automatically for you on recent Raspbian.

However, you should really do one extra step: change the default pi password or create a specific account for you. You can use the command passwd to change the password on the command line.

That’s it, you have installed Raspbian on a Raspberry Pi without a screen or keyboard (headless). I strongly recommend to follow my advice about Raspberry Pi Raspbian post-installation and security.

Picture credits: The Debian Logo belongs to the Debian project. Raspberry Pi and its logo are trademarks of the Raspberry Pi Foundation. The OpenSSH logo is copyrighted by OpenBSD. The wireless device is an icon from the Oxygen set of the KDE project provided under GNU LGPLv3.


Update: I forgot the icing on the cake: upgrading to Debian Jessie. Continue reading to learn a quick way to do it.

Continue reading “Installing Raspbian Headless (no screen, full network)”

Linux 4.1 = +50% power efficiency (when idle)

Increased battery efficiency

On my laptop, I’m running Fedora 22 which was shipped initially with a Linux 4.0 kernel. It was difficult to get 4h of battery life (3h30 was usually enough to deplete the battery down to 5%). Recently, the kernel was changed to 4.1 and because after 5h working on my laptop I got notified that I still had 10% power I got curious,

Therefore with a fully charged battery, I booted with Fedora 22 Linux kernel 4.0.4-301. I used powertop to measure the battery power usage in Watt in graphical (ex-init 5 level) and multi-user target (ex-init 3 level). I then rebooted using Linux kernel 4.1.3-201 and did the same measurement. I waited each time that the system settled down and that successive measurements where constant. Nothing was running, WiFi was ON and connected (Link Quality=64/70), screen brightness at 30%, Graphical target is using Gnome 3.

SystemD Target (~init level) Linux 4.0 (in W) Linux 4.1 (in W) Progress
Multi-User (init 3) 12,8 8,66 -32%
Graphical (init 5) 13,1 8,51 -35%

Wow! That’s great. And the estimated battery power is now up from 4h to 6h30 with WiFi ON. But with light browsing usage and some Arduino development, I got a bit more than 5h15 without requiring a wall power connection!! That close to 50% more battery life than with earlier kernels.

Where does this come from? I don’t know. There seems to have been a few pull requests about power management for kernel 4,1 but none stroke me as relevant for such a huge improvement, Matthew Garrett has proposed a patch to improve dramatically the power efficiency of Intel’s Haswell and Broadwell CPUs (and I happen to have an Haswell one), so that could have been that patch, but I did not find it in the kernel 4.1 changelog, so I doubt it was yet implemented. So I really don’t know what made change in the kernel bring such an improvement. (note: I’m running Fedora 22 and without software update, just by selecting kernel 4.0 or 4.1 at boot, I can see the difference in power consumption. So this is really a kernel-side improvement).

Did you also witness improvement when switching to Linux kernel 4.1? Let me know using any social media means!

Note to self: telinit is now deprecated in favour of systemd targets. Runlevel 3 can be reached by invoking sudo systemctl isolate multi-user.target and the switch to the “runlevel 5” can be triggered using sudo systemctl isolate graphical.target.

Picture credits: Picture was created by me using elements from the KDE project. The original materials were licensed under GNU LGPLv3, and the picture is also provided under this license terms and conditions.