

Today, I wanted to retrieve an ISO image from my Windows desktop and burn it on my Linux laptop. I thought this would be pretty much straight forward. But computers like to make you sweat and work hard for simple tasks…  I wish I had a Mac!
Anyway, Windows was bugging me and not properly sharing my folder (not all the files and folders in a share were visible from the networks!). So I decided to share a directory under my Linux laptop. Then, from Windows, I was going to copy the file to Linux.
Before, I go further in details, let me tell that I am running at present Ubuntu with Gnome.
Using Nautilus to navigate to the home folder (Menu item “Places” -> “Home Folder”), I created there a new directory.
When one right click on the new folder, he can find in the menu the option “Share Folder”. One might be prompt to install Samba or NFS for file sharing if those packages have not yet been installed. To share files with Windows, it is recommended to use the Samba service. After validating this, a window – like the one below – should be displayed.
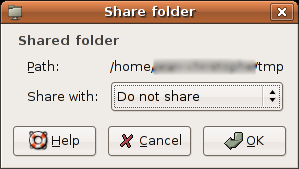
In “Share with”, one should select SMB which stands for the protocol name used by Microsoft for file sharing (recently Microsoft has changed the name to CIFS, but it does not matter here…) and which also stands for an abbreviation of Samba. One will get a new window like this one:
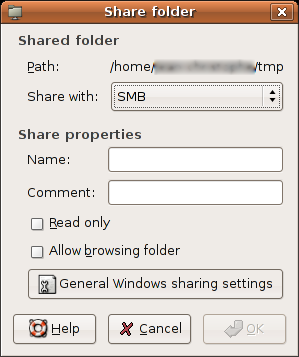
Basically, one should only need to set a network share name in the field “Name:”, and validate the entry. One might want to have a look at the other options to tune it.
Also, if one has changed the default Windows XP workgroup (sometimes called domain) on his Windows system, it would then be recommended to click on the “General Windows sharing settings” button and modify the “Domain / Workgroup” field to match the one specified on Windows.
It is almost ready now. However, if Samba was just installed during this phase a few required steps are necessary to complete the process. Samba should be activated. This is done in the menu “System” -> “Administration” -> “Services”. In the list, there is an entry about the Samba service. Next to the Samba service name there is a small box that can be check or not. One should make sure it is checked. Samba is now running.
Nevertheless, this is not all. If one tries from Windows to access Linux, strangely he cannot connect to any share on Linux, even though he has entered the correct login and password. This is because Windows XP and Samba are configured by default to send password encrypted over the network (this was not the case with Windows 98 and earlier release!)
On Linux, an additional step is needed for each user that needs to be authenticated on the network. This step will simply add a “network user” with an encrypted password in the Samba configuration. In a terminal (menu “Applications” -> “Accessories” -> “Terminal”) the following command needs to be entered, username should be replace by the Linux login name.
$ sudo smbpasswd -a username
This script will probably request to enter the “sudo” password, and then it will request the SMB password. For the second one, one can enter the password he wishes.
This operation could be added when creating new user, so it would become transparent. I do not have right now in mind how to proceed, I might update this article later, when I feel the need for this feature.
Also, if one wants to authorise a friend to access a network share but one does not want him to have the possibility to log in on Linux. One needs to create a Linux account for him and disallow login. This feature is hidden inside the “Advanced” tab of the User account creation window (see “System” -> “Administration” -> “Users and Groups” -> “+ Add User”). One needs to select “/bin/false” for the Shell, and type “/dev/null” (without the double-quotes of course) for the home directory. In the “User Privileges” tab, deselect everything. Once this user has been created, one can perform the step, mentioned above using the smbpasswd command, to create the corresponding network user. In that way, the friend will have no possible login via Gnome or a shell. But can access the shared folders over the network.
great this guide is perfect now its finally working… I don’t get why ubuntu doesn’t ask you to set up a samba user when you first share a folder…. man, if they want people to use ubuntu at least make it possible for the average person to use and not have to go into the terminal… this kinda thing really lets down ubuntu.
I think your feedback is already taken into account, see Bug #24184. However, it is still a nice to have feature, I hope this will be promoted for the release following Feisty.