Revisiting getting docker-compose on Raspberry Pi (ARM) the easy way

Whale

Two years ago I was publishing a post to build docker-compose on an ARM machine. Nowadays, you can find docker-compose on PyPI. However, if you intent to run docker-compose on a platform without Python dependencies, you might still be interested in my guide which generates an ELF binary executable.

My previous guide has worked well until release 1.22.0 after which the Dockerfile.armhf (which was merged) has been upgraded to match the changes for the X86-64 platform but broke my build instructions. The builds seems to work and generate an executable but it fails to run due to missing dependencies:

+ dist/docker-compose-Linux-armv7l version
[446] Failed to execute script docker-compose
Traceback (most recent call last):
File "bin/docker-compose", line 5, in
from compose.cli.main import main
File "/code/.tox/py36/lib/python3.6/site-packages/PyInstaller/loader/pyimod03_importers.py", line 627, in exec_module
exec(bytecode, module.dict)
File "compose/cli/main.py", line 13, in
from distutils.spawn import find_executable
ModuleNotFoundError: No module named 'distutils'

I have not found the root-cause of the problem as I am not familiar with tox, but it looks like a configuration problem of that tool. So I decided to simply use Python3 built-in virtualenv.

As in my previous guide, you need to clone the repository and choose a branch. You can take the release branch or a specific version branch (e.g. bump-1.23.2).

$ git clone https://github.com/docker/compose.git
$ cd compose
$ git checkout bump-1.23.2

The two next shell commands should modify the original build script to use virtualenv and to add the missing dependencies (which are correctly installed in the tox environment but would be missing in ours).

$ sed -i -e 's:^VENV=/code/.tox/py36:VENV=/code/.venv; python3 -m venv $VENV:' script/build/linux-entrypoint
$ sed -i -e '/requirements-build.txt/ i $VENV/bin/pip install -q -r requirements.txt' script/build/linux-entrypoint

Now you can follow the exact same steps as in the previous guide. In summary:

$ docker build -t docker-compose:armhf -f Dockerfile.armhf .
$ docker run --rm --entrypoint="script/build/linux-entrypoint" -v $(pwd)/dist:/code/dist -v $(pwd)/.git:/code/.git "docker-compose:armhf"
$ sudo cp dist/docker-compose-Linux-armv7l /usr/local/bin/docker-compose
$ sudo chown root:root /usr/local/bin/docker-compose
$ sudo chmod 0755 /usr/local/bin/docker-compose
$ docker-compose version
docker-compose version 1.23.2, build 1110ad01
docker-py version: 3.6.0
CPython version: 3.6.8
OpenSSL version: OpenSSL 1.1.0j 20 Nov 2018

Installing Ubuntu Server on Raspberry Pi – Headless

Raspberry Pi 2 Model B+ v1.1This article will describes the steps to install Ubuntu Server 16.04 on a Raspberry Pi 2. This article provides extra steps so that no screen or keyboard are required on the Raspberry Pi, it will be headless. But of course you need a screen and keyboard on the computer on which you will download the image and write it to the MicroSD card. It is similar to a previous article about installing Debian on Raspberry Pi 2, also headless mode.

Disclaimer: you need to know a minimum about computer, operating system, Linux and Raspberry Pi. If you just want to install an Operating System on your Raspberry Pi, get NOOBS the Raspberry Pi Foundation installer. This guide is for more advanced users. If you follow this guide but do mistakes, you might wipe out disk content or could even brick Micro SD card or what not.

Known limitations: This guide will not work for Raspberry Pi 3 (unless you follow these extra steps to boot the Ubuntu Server raspi2 image on a Raspberry Pi 3) and currently cannot work easily on Raspberry Pi 3 B+ because there are no specific DTB on Ubuntu (Linux kernel device tree blob, although some people on Fedora 28 beta are successful by simply renaming the DTB from the Raspberry Pi 3 model) and one need a new uboot for this model (which in the Ubuntu Server images is an “older” version not currently supporting the new 3 B+ model, and even the Raspberry Pi 2 image for Bionic Beaver, the current development version which will become Ubuntu 18.03, does not support it yet).

Install the Ubuntu Server image

Ubuntu Circle of Friend LogoGrab your official Ubuntu Server for Raspberry Pi 2 image (the latest version at time of writing is ubuntu-16.04.4-preinstalled-server-armhf+raspi2.img.xz but in a few days the image for Ubuntu 16.04.4 should be available, it will save you some time when upgrading it (and save some write cycles on your Micro SD card). Once downloaded, you need to insert the Micro SD card on your computer (you probably need a USB card reader for that) and try to figure out which device it corresponds to, see the Ubuntu documentation for further guidance. I assume you know what you do but be weary that the next command if done on the wrong device could wipe out the data on that device. I do not take any responsibility if things go wrong.

$ xzcat ubuntu-16.04.4-preinstalled-server-armhf+raspi2.img.xz | dd of=<device> bs=4M oflag=dsync status=progress

Create a user account and allow SSH access

Then make sure to sync your media data and then mount the newly created partition (normally there are 2 partitions created, we are interested in the second one, it should be named <device>p2 or <device>2:

$ sync
$ sudo mkdir -p /mnt/rpi
$ sudo mount <device>2 /mnt/rpi

User account creation

As the Raspberry Pi uses an ARM processor and the computer on which I created the Micro SD card is a x86_64 processor, I cannot simply chroot and execute adduser in the newly mounted partition. The programs are compiled for a different architecture. So to add a new user we will need to do it manually by editing system files. We will create a new user and group, then add the corresponding entries in the files where the passwords are kept.

Add a new user (replace $(whoami) by your username if you want a different username than your current one).

$ echo "$(whoami):x:1000:1000:<Full Name>:/home/$(whoami):/bin/bash" | sudo tee -a /mnt/rpi/etc/passwd

Now create your group by editing /mnt/rpi/etc/group:

$ echo "$(whoami):x:1000:"" | sudo tee -a /mnt/rpi/etc/group

Now edit the group password database:

$ echo "$(whoami):*::$(whoami)" | sudo tee -a /mnt/rpi/etc/gshadow

And the user passsword database (it will have no default password but allow SSH key base authentication over the network and it will request to set a password upon first login. Note that with this configuration remote SSH login cannot happen without the SSH key, so it is a secure configuration):

$ echo "$(whoami)::0:0:99999:7:::" | sudo tee -a /mnt/rpi/etc/shadow

Grant your user access to administrative tasks (via sudo), but still requires that the user enter his own password:

$ echo "$(whoami) ALL=(ALL) ALL" | sudo tee /mnt/rpi/etc/sudoers.d/20_$(whoami)_superuser

User home folder and SSH access

Now we shall create the user’s home and add the SSH public key so we can login (it is assumed that you have a public RSA key under your home directory named ~/.ssh/id_rsa.pub change the name if it’s different):

$ sudo cp -R /mnt/rpi/etc/skel /mnt/rpi/home/$(whoami)
$ sudo chmod 0750 /mnt/rpi/home/$(whoami)
$ sudo mkdir -m 0700 /mnt/rpi/home/$(whoami)/.ssh
$ cat ~/.ssh/id_rsa.pub | sudo tee -a /mnt/rpi/home/$(whoami)/.ssh/authorized_keys
$ sudo chmod 0600 /mnt/rpi/home/$(whoami)/.ssh/authorized_keys
$ sudo chown -R 1000:1000 /mnt/rpi/home/$(whoami)

Setup Systemd for enabling SSH access and headless mode

Normally everything else should be correctly setup. However you might want to have a look at systemd configuration, mostly of interests are which default target is in use (for headless you want multi-user.target) and if the SSH service is part of the default target. What I did was the following (it also avoid creating the ubuntu user):

$ cd /mnt/rpi/lib/systemd/system
$ rm -f default.target
$ ln -s multi-user.target default.target
$ cd /mnt/rpi/etc/systemd/system/multi-user.target.wants
$ ln -s /lib/systemd/system/ssh.service ssh.service

(if the last command fails because the file already exist then it is all OK)

Start Ubuntu Server on Raspberry Pi 2

Now unmount the card and eject it: sudo umount /mnt/rpi. You can now safely insert the card in your Raspberry Pi 2 and boot it. It boots slower than with Raspbian, so be patient. Note that with all the above configuration, you do not need to boot with a keyboard or screen attached to your Raspberry Pi. Only an Ethernet cable and the power plug are necessary.

Now you need to find your newly installed Ubuntu Server on your network, the default hostname is ubuntu so you could always start with that (ssh $(whoami)@ubuntu) if it is not in conflict with another device of yours and if your router is clever enough to have updated the DNS resolver. Or else you need to scan your network for it. To scan your network you need to know your subnet (e.g. 192.168.1.0 with a netmask of 255.255.255.0) and have nmap installed on your computer (sudo dnf install nmap will work for Fedora, and it is as easy for Debian/Ubuntu-based distros as well, just replace sudo apt-get install nmap).

$ sudo nmap -sP 192.168.1.0/24

Of course you need to adapt the above command to your subnet. The “/24” part is the netmask equivalent of 255.255.255.0. I recommend running the above command with sudo because it will display the MAC address of all the discovered devices which will help you spot your Raspberry Pi as nmap is displaying the vendor attached to each MAC address. See for yourself in the example output:

Starting Nmap 6.47 ( http://nmap.org ) at 2015-07-19 20:12 CEST
(...)
Nmap scan report for ubuntu.lan (192.168.1.9)
Host is up (0.0060s latency).
MAC Address: B8:27:EB:1E:42:18 (Raspberry Pi Foundation)
(...)
Nmap done: 256 IP addresses (8 hosts up) scanned in 2.05 seconds

Now you can simply connect to your RPi using SSH:

ssh $(whoami)@192.168.1.9
Enter passphrase for key '~/.ssh/id_rsa':
You are required to change your password immediately (root enforced)
Welcome to Ubuntu 16.04.1 LTS (GNU/Linux 4.4.0-1017-raspi2 armv7l)

(...)

142 packages can be updated.
69 updates are security updates.

(...)

WARNING: Your password has expired.
You must change your password now and login again!
(current) UNIX password:

Now that you are authenticated and have access to your newly installed Ubuntu Server, it is time to upgrade it.

Upgrade Ubuntu Server to latest packages

The tool tmux should already be installed on your system (or do sudo apt install tmux), so use it to create a new session, so even if you get a network problem your session is not killed (simply do tmux attach)

$ tmux
$ sudo apt dist-upgrade
$ sudo systemctl reboot

Note: it is possible that unattended-upgrade kicks in before you can do the upgrade manually. Then wait an hour or more (depending on the speed of your internet connection and Micro SD card mainly) before doing the above steps. It is still worth while as the dist-upgrade command will perform more thorough upgrade (potentially removing deprecated packages or even downgrading some if necessary) but you will be in sync with the latest and greatest Ubuntu Server.

Picture credits: Photo of a Raspberry Pi board by me, see the website licensing policy. Ubuntu Circle of Friends logo is copyright by Canonical.

Ubuntu Core – Atomicity rough on the edges

View of a Harbour Terminal before Containers existed
Before the invention of containers, docker was a much more manual job. And that’s what I’m looking for my Raspberry Pi.

I’ve been recently trying to play with Ubuntu Core on my 2nd Raspberry Pi 2. I like the concept of a minimalist host with atomic updates and the possibility to run my services inside containers. In addition, snap looks like an interesting package system (and more than that). But this setup does not fit my use cases, it is perfect for repeatable testing and safe environment for deployment. However I need a system that is stable and safe, but which I can tinker with (modify a specific configuration or kernel in order to optimise its use or detect new devices) and which grow organically (depending on my free time).

Introduction to Ubuntu Core

So Ubuntu Core (or the Project Atomic) do appeal to me but they are too restrictive for my use cases. I need more freedom. Anyway, for those of you who could be interested in these projects here is a quick review of these systems with respect to day-to-day use as I’m not going to explain the philosophy of Core/Atomic neither of snap/atomic technologies.

Both Ubuntu Core (armhf variant) and CentOS Atomic Host (x86_64 variant) felt a bit rough and despite carrying the respective name Ubuntu and CentOS I had to reconsider how I am used to administer such boxes. A basic concept is that you install a core (or minimalist) OS and you cannot pretty much change it (most parts are read only), but it should have everything to run containers. For Atomic Host, there is no way to install additional packages, you need to add every other bit of software as a container. The big difference with Ubuntu Core is that you have snaps which allows to extend the core OS without having to install and configure containers manually. A snap package – once installed – feels more or less like if you just installed a deb package. But there is a big difference, they are like little containers or sandboxed process(es) already neatly packaged so they feel like a normal command, but a lot is going on behind the scene. Here is an example, I’ve installed `htop` on my Raspberry Pi 2, now I get two distinct results if I run it with a standard user or with the super user rights, a behaviour uncommon on a standard Linux installation:

Standard User Super user

Snap htop - standard user
Snap htop – Standard User

Snap htop - super user (via sudo) - see complete list of processes
Snap htop – Super User (via sudo)

As it is visible in the case of htop, by default when I run it, htop shows only processes where the owner is myself. This is not bad but it is different from traditional Linux distribution and so you need to get the habit to do `sudo htop` to see all processes, but take care you then run htop as super user, and htop allows you to kill processes, so be careful.

However, on Raspberry Pi (and probably other ARMv7 (aka armhf) platforms) there is a very limited amount of snap packages available yet. It is probably changing fast, but if you run today Ubuntu Core 16 you can’t install much snaps and need to rely on Docker containers for adding extra applications to the base system (more on that later, including its current limitations).

Basic system configuration absent

Let’s get back to the beginning and I mean by that right after the installation of Ubuntu Core upon first boot. I still had my keyboard and screen attached to it (and you need it in order to login with your Launchpad SSO login to create the first user). After the first boot, I was not offered the possibility to change the keyboard layout (I do not have a US layout) but at least on Ubuntu Core one can change it afterwards by editing the file `/etc/default/keyboard`, this feat is not possible on Atomic Host. Anyway, not such a big issue as I’m using my Raspberry Pi mostly (if not alway) via SSH then it does not matter anymore. Staying on the localization topic, both systems do not allow changing the locale (language, regional preferences, etc.). On Atomic Host it is set to US with the “peculiar” time and date format ;-) no offense! Similar fate on Ubuntu Core but they are using the C locale (which sadly for me also uses the US date/time format). Although I would anyway stick to the English language, I don’t like the regional choice and I don’t like the lack of choices here.

So let’s move back to an SSH connection, at least the keyboard layout is no longer an issue. But here comes the next one ;-) whenever I use SSH, the first thing I do is launch a new tmux session or attach to an existing one. I’m open to other solutions, so if the host only has screen or byobu, I’m also fine. However, Ubuntu Core for ARMv7 does not ship by default with any of them, nor are they any existing snap package. So there is no simple way (out of compiling from source and creating a snap package) to have safe SSH session.

Docker

Normally thanks to container technology, it is possible to install more or less everything I would need and with some clever alias it would seem much like a snap installation. So I just wanted to create a Dockerfile which reference Alpine Linux and install tmux and build the container using Docker. Not possible with Ubuntu Core and the Docker snap. According to the Docker snap information, I should be creating a folder under `$HOME/apps/docker/1.6.xxx` (eventhough Docker 1.11.2 was installed, weird), but it does NOT work. The AppArmor profile installed with Docker snap denies it. I’ve tried many different folders to no avail. This is not a misconfiguration of Ubuntu Core but rather one of the Docker snap packager, but the end result is that as a user Ubuntu Core on armhf is barely usable (lack of too many essential tool, no snap and cannot easily use Docker).

Other rough edges with Docker are that your default user does not belong to the Docker group, so you need to sudo every single Docker command. There is also no way to add yourself to the Docker group (as the group is defined in the standard file `/etc/group` which is on a read-only filesystem). Your default user is also not a real traditional user, it is an “extra user” (did not know this subtlety before this) so there are a bunch of things that are not compatible with it like you cannot launch a container to run as yourself (docker run -u $(whoami) ...) as you are not a standard user (no entry in `/etc/passwd`), you are an extra users (see in `/var/lib/extrausers/passwd`), but at least it would be possible to do it specifying your user ID (e.g. 1000)! This is all logic but “rough”. A corollary to the previous statements is that you cannot run Docker in user namespaces mode (unprivileged Docker container) as you cannot add yourself to the Docker group.

At least the Docker snap includes Docker Compose, that is cool. On Atomic Host, Docker is installed but not Docker Compose. As the file system is also read-only there is good way to install Docker Compose in a central place, it should be run within a container. At least on Atomic Host, it is very easy (as on standard Linux OS) to create Dockerfile and build them. So these limitations (of not having Docker Compose and some other tools) can be overcome with some efforts.

Final Try

My next steps was to download some scripts and tools. However both curl and wget are absent of the base installation. Even git is not available as a snap or on the core installation. There is no way to build a Dockerfile, so in the end to have tmux, curl, git, etc. I had to create a lxd container running Ubuntu just to get a normal OS (or from my laptop, I could download the scripts and via scp pushing them to Ubuntu Core). But then I simply prefer to run Ubuntu Server or Raspbian on my Raspberry Pi.

For me I’ve lost too much time on this already. Ubuntu Core seems nice I really like the principles and approach, but it is definitively missing too many basic tools, too rough for my taste and available free time.

Conclusion

I will install Ubuntu Server or CentOS 7 for armhf on my second Raspberry Pi 2. Ubuntu Core is perhaps still a bit too young (maybe it is specific to the armhf platform) and requires too much work for my needs. At least this experience made me understand that I don’t want a lock down and safe box, but I need flexibility.

Picture credits: Public Domain. The picture is part of the State Library of South Australia collection (see original B 4433 photo).

Getting docker-compose on Raspberry Pi (ARM) the easy way (updated)

I really like docker-compose, it has a simple language (YaML) to describe how to build and run a container, so you do not have to remember (or count on your history availability) the long `docker build ...` and `docker run ...` commands (and many others).

However, docker-compose is not (yet) available for Raspberry Pi or any other ARM architecture.

(Update 2017-03-02: but we are getting there. A first series of patches to allow support has been merged in the master branch but is not yet released. However, it does not look like official releases of compose for ARM will be provided in the near future, but at least building them will become even easier.)

(Update 2019-03-24: it is now easily available using pip. Doing pip install docker-compose works on ARM.)

So I forked the official Docker Compose repository and did a few minimalistic changes in order to get a built of docker-compose for Raspberry Pi. I have created a Pull Request in the hope that it might get accepted and that ARMv7 be officially built. But while waiting for the review process to be triggered, here is how to do it for yourself.

Download the Project

As pre-requisite you need to have `git` (sudo apt-get install git) and `docker` (see my previous article) already installed on your platform.

Then get a copy of the project on your local Raspberry Pi.

$ git clone https://github.com/docker/compose.git
$ git checkout release

Now apply the following patch (Update 2017-03-02: soon when the master branch will be merged into the release one, these extra steps won’t be necessary):

$ cd compose
$ cp -i Dockerfile Dockerfile.armhf
$ sed -i -e 's/^FROM debian\:/FROM armhf\/debian:/' Dockerfile.armhf
$ sed -i -e 's/x86_64/armel/g' Dockerfile.armhf

Build and install docker-compose

To build the docker-compose binary, the procedure is rather simple. First you need to build the docker image which will be used to set-up the build environment. Second and last you need to run the container which will build docker-compose. At the end the binary will be available under the `dist` subfolder.

$ docker build -t docker-compose:armhf -f Dockerfile.armhf .
$ docker run --rm --entrypoint="script/build/linux-entrypoint" -v $(pwd)/dist:/code/dist -v $(pwd)/.git:/code/.git "docker-compose:armhf"

After several minutes you will get a binary file which you can then install on your system:

$ ls -l dist/
total 6816
-rwxr-xr-x 1 pi pi 6976500 Feb  8 11:41 docker-compose-Linux-armv7l
$ sudo cp dist/docker-compose-Linux-armv7l /usr/local/bin/docker-compose
$ sudo chown root:root /usr/local/bin/docker-compose
$ sudo chmod 0755 /usr/local/bin/docker-compose
$ docker-compose version
docker-compose version 1.11.0-rc1, build daed6db
docker-py version: 2.0.2
CPython version: 2.7.13
OpenSSL version: OpenSSL 1.0.1t  3 May 2016

Goodies: Install docker-compose bash autocompletion

Docker Compose provides autocompletion for bash. Installing it is as simple as doing:

$ sudo curl -L https://raw.githubusercontent.com/docker/compose/$(docker-compose version --short)/contrib/completion/bash/docker-compose -o /etc/bash_completion.d/docker-compose

Conclusion

If you might wonder why I stated “the easy way” in my title, well if you want to master Docker, you ought to consider the above easy :-)

Of course in our field of work nothing is as simple as a mouse click, especially when you need to create something that is not (until today) provided out of the box. If you want real easy simply install it using pip install docker-compose should work.

A Time Server in a Container – Part 1

GPL https://commons.wikimedia.org/wiki/File:Sablier-temps-icone-5376-128.png

To learn Docker in details I decided to use it to run a local time server using ntpd from the ntp.org project.

I have used an incremental approach where I started with an easy setup and then increased the challenges either to improve the time server or to better understand Docker.

Getting Started

So why ntpd and not <put your favourite time server>

I know ntpd for having configured it many times in the past 10 years. So I wanted to start with it first to quickly get time synchronisation working.

Which platform?

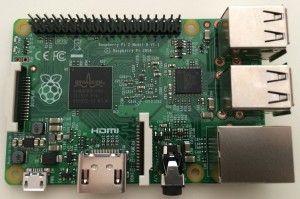
I have a Raspberry Pi (abbreviated RPi from now on) which serves as DHCP server and local forwarding and caching of DNS queries for my LAN. It had early support for Docker back in October when I started my experiment which added a bit of spice to it.

Getting Docker on a Raspberry Pi

There are many ways to get Docker running on your RPi. You could get the Hypriot OS Linux distribution which has everything setup nicely for running Docker containers. You can compile Docker on your platform of choice (which I had to do to squash a few early adopters’ bugs). You can install a tarball containing the binaries for your platform. But if running Raspbian Jessie – like I was – you can today just include Docker’s own repository and install a binary version using apt-get. Make sure your Kernel is recent (Docker requires 3.10 at least, but if you have a properly updated Raspbian it should be running 4.4 at the time of writing).

You can follow Docker’s installation guide for Debian, but by default it will install you the x86_64 Docker repository. As hinted in the documentation, for other architecture you need to use the [arch=...] clause. In addition, Docker provides a specific variant of the package for Raspbian. So for Raspbian Jessie, use the following entry for your docker.list file:

deb [arch=armhf] https://apt.dockerproject.org/repo raspbian-jessie main

Continue to follow the Docker guide, including how to set up non-root access to a specific user.

Creating a Docker image for ntpd

Create a specific folder somewhere on your Raspberry Pi storage (e.g. mkdir -p ~/projects/docker/ntpd) and create a file Dockerfile.armhf (I use the extension .armhf so I can have distinct Dockerfiles for each platform I use) with the following content:

FROM armhf/ubuntu:16.04
RUN apt-get update \
    && apt-get install -y --no-install-recommends ntp \
    && apt-get clean -q \
    && rm -Rf /var/lib/apt/lists/*
ENTRYPOINT ["/usr/sbin/ntpd"]

Note: This file as well as newer version of it and instructions to build and run the container are available on my GitHub ntp container project. In the rest of this blog post, I’m only going to detailed how I approach running the container and solve problems.

The first line state that the base image for the container will be Ubuntu 16.04 (the specific variant for RPi architecture). The second until the fifth lines are commands we execute on top of the base image, basically it updates the packages list to install the latest version of ntpd with the smallest dependencies, and it removes any cached or temporary files. So we minimise the size of the image on disk. Finally the last line, is the command that will be executed by Docker when instructed to run the container. I have used the term ENTRYPOINT because it allows me – while experimenting – to change the list of parameters I send to ntpd when I create the container and run it. This gives me flexibility with testing different parameters.

I picked up Ubuntu as the base image because it has sane default for the ntpd configuration file. It will use the NTP Pool project and the configuration is secured by default. Note that other base images could have also worked and have also sane default. I could have used Alpine Linux base image, it is really compact and lightweight, would have been perfect for a small platform like a Raspberry Pi, but it does not provide the ntpd packages from the NTP project which I wanted to start with. It only supports OpenNTPD (which does not support leap seconds, so it was a no go for me) and Chrony (which could be a good alternative but as I mentioned before I wanted to first experiment with Docker not learn yet another NTP application).

Let’s build the container image (I named the image “article/armhf/ntpd” and tagged it with the current date, but just name it like you want):

$ docker build -f Dockerfile.armhf -t article/armhf/ntpd:20170106.1 .

Running the NTP container

We are now going to spawn an instance of the container image in foreground to see what is going on and to notice any error:

$ docker run --rm -it article/armhf/ntpd:20170106.1 -n
 6 Jan 14:03:30 ntpd[1]: ntpd 4.2.8p4@1.3265-o Wed Oct  5 12:38:30 UTC 2016 (1): Starting
 6 Jan 14:03:30 ntpd[1]: Command line: /usr/sbin/ntpd -n
 6 Jan 14:03:30 ntpd[1]: Cannot set RLIMIT_MEMLOCK: Operation not permitted
 6 Jan 14:03:30 ntpd[1]: proto: precision = 1.198 usec (-20)
 6 Jan 14:03:30 ntpd[1]: Listen and drop on 1 v4wildcard 0.0.0.0:123
 6 Jan 14:03:30 ntpd[1]: Listen normally on 2 lo 127.0.0.1:123
 6 Jan 14:03:30 ntpd[1]: Listen normally on 3 eth0 172.17.0.2:123
 6 Jan 14:03:30 ntpd[1]: Listen normally on 4 lo [::1]:123
 6 Jan 14:03:30 ntpd[1]: Listening on routing socket on fd #21 for interface updates
 6 Jan 14:03:30 ntpd[1]: start_kern_loop: ntp_loopfilter.c line 1126: ntp_adjtime: Operation not permitted
 6 Jan 14:03:30 ntpd[1]: set_freq: ntp_loopfilter.c line 1089: ntp_adjtime: Operation not permitted
 6 Jan 14:03:31 ntpd[1]: Soliciting pool server 193.200.241.66
 6 Jan 14:03:32 ntpd[1]: Soliciting pool server 90.187.7.5
 6 Jan 14:03:32 ntpd[1]: adj_systime: Operation not permitted
 6 Jan 14:03:32 ntpd[1]: Soliciting pool server 129.70.132.37
 6 Jan 14:03:33 ntpd[1]: Soliciting pool server 85.25.210.112
 6 Jan 14:03:33 ntpd[1]: Soliciting pool server 31.25.153.77
 6 Jan 14:03:34 ntpd[1]: Soliciting pool server 178.63.9.212
 6 Jan 14:03:34 ntpd[1]: Soliciting pool server 193.22.253.13
^C 6 Jan 14:03:40 ntpd[1]: ntpd exiting on signal 2 (Interrupt)

We have a few errors (Operation not permitted) which I have highlighted above, one is about RLIMIT_MEMLOCK (this is about resetting the limit of the maximum locked-in-memory address space, ntpd uses it to forbid its main process from swapping to limit jitter) and the other ones are about ntp_adjtime and adj_systime (both are used by ntpd to interface with the Kernel and adjust the system time).

By default ntpd is running as root user, so it should have enough privilege for these operations. In addition, even though Docker supports running unprivileged containers (i.-e. the root user inside the container is mapped to a normal user on the host, this is based on user namespaces (see namespaces(7)), this is not the default Docker configuration, so my root user inside the container is the root user outside the container (and if Docker would be configured to use user namespace, they are not compiled in the Raspberry Pi foundation Kernel. So it is at the moment not possible to use that feature on a Raspberry Pi without some extra efforts, but I will details this in a future article).

In order to implement basic privilege limitations of container, Docker can use various security feature of the Linux Kernel to limit the container accessing certain sensible Kernel calls, the most notable ones are Linux Capabilities (since Docker 1.2), Linux SECCOMP filtering (since Docker 1.10, but better use Docker 1.12+ as pervious default SECCOMP profiles were in conflict with the Linux Capabilities management of Docker. In addition, the Raspbian Kernel (version 4.4 as of writing) has not the built-in support for SECCOMP filtering, so this functionality is not usable on Raspberry Pi, unless you compile your own Kernel) and Linux MAC (like SELinux or AppArmor, but none of them are available on Raspberry Pi without recompiling your own Kernel and installing the user space tools). So Docker on Raspberry Pi can only use Linux Capabilities as security feature.

By default Docker provides each container with a reasonable set of capabilities (see Docker documentation on capabilities). If you check both documentation (the Linux Capability manual and the Docker runtime privileges doc), you will find out that basically our container is missing the CAP_SYS_RESOURCE and CAP_SYS_TIME capabilities. Now there are 2 ways to add them, most online guide would tell you that when you run into “operations denied” errors, just add the --privilege flag to the docker run command line and it will be fixed, that’s the first way and it’s the wrong approach (sure it works, but it is like deactivating SELinux because you are not allowed to perform an operation). The other way is to add the missing capabilities to the container. This can be done by using the --cap-add flag. That’s what I’m going to show now:

$ docker run --rm -it --cap-add SYS_RESOURCE --cap-add SYS_TIME article/armhf/ntpd:20170106.1 -n
 7 Jan 11:19:24 ntpd[1]: ntpd 4.2.8p4@1.3265-o Wed Oct  5 12:38:30 UTC 2016 (1): Starting
 7 Jan 11:19:24 ntpd[1]: Command line: /usr/sbin/ntpd -n
 7 Jan 11:19:24 ntpd[1]: proto: precision = 1.823 usec (-19)
 7 Jan 11:19:24 ntpd[1]: Listen and drop on 0 v6wildcard [::]:123
 7 Jan 11:19:24 ntpd[1]: Listen and drop on 1 v4wildcard 0.0.0.0:123
 7 Jan 11:19:24 ntpd[1]: Listen normally on 2 lo 127.0.0.1:123
 7 Jan 11:19:24 ntpd[1]: Listen normally on 3 eth0 172.17.0.2:123
 7 Jan 11:19:24 ntpd[1]: Listen normally on 4 lo [::1]:123
 7 Jan 11:19:24 ntpd[1]: Listening on routing socket on fd #21 for interface updates
 7 Jan 11:19:25 ntpd[1]: Soliciting pool server 213.95.21.43
 7 Jan 11:19:26 ntpd[1]: Soliciting pool server 134.119.8.130
 7 Jan 11:19:26 ntpd[1]: Soliciting pool server 46.4.32.135
 7 Jan 11:19:27 ntpd[1]: Soliciting pool server 213.136.86.203
 7 Jan 11:19:27 ntpd[1]: Soliciting pool server 178.63.9.212
 7 Jan 11:19:27 ntpd[1]: Listen normally on 7 eth0 [fe80::42:acff:fe11:2%6]:123
 7 Jan 11:19:27 ntpd[1]: new interface(s) found: waking up resolver
 7 Jan 11:19:27 ntpd[1]: Soliciting pool server 46.165.212.205
 7 Jan 11:19:28 ntpd[1]: Soliciting pool server 109.239.58.247
 7 Jan 11:19:28 ntpd[1]: Soliciting pool server 131.188.3.221
 7 Jan 11:19:28 ntpd[1]: Soliciting pool server 78.46.189.152
 7 Jan 11:19:28 ntpd[1]: Soliciting pool server 195.50.171.101
^C  7 Jan 11:22:40 ntpd[1]: ntpd exiting on signal 2 (Interrupt)

To make sure this is working, first verify that you do not have any time synchronisation service running: $ sudo systemctl stop systemd-timesyncd ntp.

Then change the system time by shifting it by 5 seconds: $ sudo date -s "5 seconds".

Check that your system clock is now off by 5 seconds:

$ ntpdate -q time1.google.com
server 216.239.35.0, stratum 2, offset -5.002284, delay 0.14117
18 Jan 11:27:55 ntpdate[5217]: step time server 216.239.35.0 offset -5.002284 sec

Start the container in the background this time: $ docker run --name ntpd --detach --restart always --cap-add SYS_RESOURCE --cap-add SYS_TIME article/armhf/ntpd:20170106.1 -g -n

Wait a few seconds and query again the network time using the above ntpdate command. The offset should now be below 5 seconds and probably close to 0 second.

You have now a ntp service running inside a container and synchronising your system clock using Internet time servers from the NTP pool project. If you want to stop the experiment here and restore your system, you need to stop the container ($ docker stop ntpd) and block it from restarting at next boot ($ docker update --restart=no ntpd) and perhaps reboot so that you reactivate the default time synchronisation service.

But if you want to keep experimenting or let the container do its job of time synchronisation, you should make sure to deactivate any other time synchronisation mechanisms to avoid conflicts if you want to keep your NTP container running:

$ sudo timedatectl set-ntp false 
$ sudo systemctl disable ntp chronyd
$ sudo systemctl mask systemd-timesyncd
$ sudo systemctl stop systemd-timesyncd ntp chronyd

Foreword about Time and NTP on a Raspberry Pi

The Raspberry Pi (at the time of writing this applies to all models) has no real time clock (RTC) module on its board. A RTC is a small oscillator (e.g. quartz, like in your electronic wristwatch) plus some electronic to keep track of time and a battery (or equivalent). Those RTCs help a system keep track of time when there are off and in the early phases of boot. On a standard desktop or laptop computer the motherboard has an RTC. Many oscillators are not particularly accurate (low quality) with non-stable frequencies which can depend on external factors such as room temperature. It is possible to add a RTC module to the Raspberry Pi (I will have a detailed article on that soon), but without RTC you need a network connection in order for the RPi to know the current time.

On Linux, the kernel manage 2 clocks, the hardware clock (which is based on the RTC) and the system clock (which is the clock used by the system to query/set the time, this clock is ticking using a clocksource such as a CPU/SoC timer, Kernel jiffies, etc.). On boot, the current time is read from the hardware clock and is used to initialise the system clock. The system clock is then driven by the ticks from the selected clocksource and the time read at boot from the hardware clock. Usually, on shutdown, many Linux distribution are configured to store the system clock in the hardware clock.

The Raspberry Pi has maybe no hardware clock but it has a clock source (current clocksource on Raspberry Pi 2, other models may differ):

[    0.000000] arm_arch_timer: Architected cp15 timer(s) running at 19.20MHz (phys).
[    0.000000] clocksource: arch_sys_counter: mask: 0xffffffffffffff max_cycles: 0x46d987e47, max_idle_ns: 440795202767 ns
[    0.000010] sched_clock: 56 bits at 19MHz, resolution 52ns, wraps every 4398046511078ns
[    0.000032] Switching to timer-based delay loop, resolution 52ns

So if the time is set on boot, the OS can keep track of the time even if disconnected and as long as it is up and running. Systemd 213 introduced a new service systemd-timesyncd which is a SNTP client implementation, so it is able to query a network time server and set the OS system time based on the response. This service has an extra feature for systems without RTCs, it saves the system time on disk on shutdown. So when your Raspberry Pi reboot, it can use the stored time to initialise its system time while waiting for more accurate time once the network is ready. Sure during the early boot process the system time might be off by a couple of seconds but it is better than nothing.

As for NTP, it is adjusting the system time based on responses from network time servers or when offline based on the clock drift NTP has been calculating for the current clock source. This means that if you run NTP, it is good to let it run at least 24hours so it can accurately measure the clock source drift and then it can compensate it during network disconnection periods. In addition, NTP will regularly sync back the system time to the hardware time to correct the RTC clock. In up coming articles, we will see how we can add a RTC to our Raspberry Pi and how to overcome the challenges of allowing RTC access to NTP inside the container and increasing the clock accuracy. In addition, we will see how we can become an NTP network time server for the local LAN.

What did we learn about Docker

First, we practiced the basics of building a container (the Dockerfile syntax and docker build ... command), running a container in foreground or background mode (docker run ...) and controlling the running container (docker stop ... and docker update ...). I did not yet elaborate much on the capabilities of these commands offer but it is my intention that we will discover them further as we progress we the experiment.

Second, we learned about some of Docker security measures (like Linux capabilities) and limitations of the current Raspberry Pi platform (like no SECCOMP filtering or AppArmor or user namespace), and we also learned how to extend a container permission by adding new capabilities.

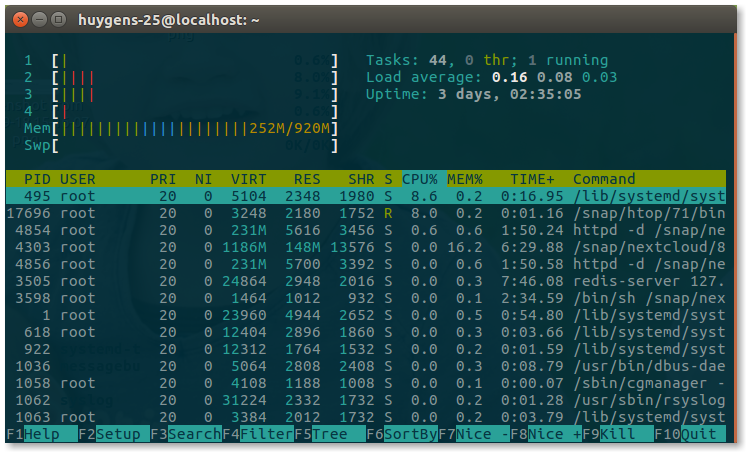
Next to learn will be how to provide access to specific devices (such as an RTC), how to do simple monitoring (checking the container is running, its resource usage and logs), how to increase its security (dropping unnecessary capabilities, using the other security measures). With this quest we will learn a lot on the Raspberry Pi as well, we will add an RTC module, we will compile our own Kernels in order to add new security functions and improve the OS jitter, etc.

Upcoming articles

I’ve been busy in the past months and did not update much this  site. However, here are a few hints about some upcoming articles:

  • Install and run Docker on Raspberry Pi: published
  • Run ntpd to provide time to your local network (Docker), I will talk about the pros and cons of running that on a Raspberry Pi: published
  • Run dnsmasq to provide a DHCP and DNS resolver on your local network (Docker): draft-only
  • This website is now using TLS so that the URL has changed to HTTPS. The certificate authority is Let’s Encrypt which my hosting provider is offering easily. I will show how easy it can be to setup HTTPS on WordPress: draft-only
  • I have a few more unfinished articles which might still take some time to complete, topics are ranging from: LXC advance usage and tips&tricks, LXD first usage, Linux SSH key management, SSD caching on Linux, FreeBSD/Arch Linux on Raspberry Pi 2.
  • Last but not least, I ought to announce why I’ve been so busy in the past months (and years). I will give some hints soon.

An Unpredictable Raspberry Pi

Critical Miss! by Scott Ogle, CC BY-SA 2.0
Random Number Generator – Photo by Scott Ogle, CC BY-SA 2.0

Our computers are not really good at providing random numbers because they are quite deterministic (unless you count these pesky random bugs that make working on a computer so “enjoyable”). So we created different ways to generate pseudo-random numbers of various qualities depending on the use. For cryptography, it is paramount to have excellent random numbers, or an attacker could predict our next move!

Getting unpredictable is a difficult task, Linux tries to provide it by collecting environmental noise (e.g. disk seek time, mouse movement, etc.) in a first entropy pool which feeds a first Cryptographically Secure Pseudo-Random Number Generator (CSPRNG) which then output “sanitised” random numbers to different pools, one for each of the kernel output random device: /dev/random and /dev/urandom.

Raspberry Pi Logo (a Raspberry)

Our goal is to help our Raspberry Pi to have more entropy, so we will provide it with a new entropy collector based on its on-board hardware random number generator (HW RNG).

I have already presented quickly why you need entropy (and good one), and also a quick way of having more source for the Linux kernel entropy pool for the Raspberry Pi using Raspbian “Wheezy” or for any computer having a TPM chip on board.

This article is an update for all of you who upgraded their Raspbian to Jessie (Debian 8). The new system uses SystemD for the init process rather than Upstart for previous release.

The Raspberry Pi has an integrated hardware random number generator (HW RNG) which Linux can use to feed its entropy pool. The implication of using such HW RNG is debatable and I will discuss it in a coming article. But here is how to activate it.

It is still possible to load the kernel module using $ sudo modprobe bcm2708-rng. But I know recommend using the Raspberry Pi boot configuration, as it is more future proof: if there is a newer module for the BCM2709 in the Raspberry Pi 2 (or any newer model), using Raspberry Pi Device Tree (DT) overlays should always work. DT are a mean to set-up your Raspberry Pi for certain tasks by selecting automatically the right modules (or drivers) to load. It is possible to activate the HW RNG using this methods.
Actually, we do not need to load any DT overlays, but only to set the random parameter to ‘on‘. You can achieve this by editing the file /boot/config.txt, find the line starting with ‘dtparam=(...)‘ or add a new one starting with it. The value of dtparam is a comma separated list of parameters and value (e.g random=on,audio=on), see part 3 of the Raspberry Pi documentation for further info. So at least, you should have:

dtparam=random=on

With this method, you have to reboot so that the bootloader can pick-up automatically the right module for you.

Now install the rng-tools (the service should be automatically activated and started, default configuration is fine, but you can tweak/amend it in /etc/default/rng-tools), and set it to be enable at next boot:

$ sudo apt-get install rng-tools
$ sudo systemctl enable rng-tools

After awhile you can check the level of entropy in your pool and some stats on the rng-tools service:

$ echo $(cat /proc/sys/kernel/random/entropy_avail)/$(cat /proc/sys/kernel/random/poolsize)                                 
1925/4096
$ sudo pkill -USR1 rngd; sudo systemctl -n 15 status rng-tools
rngd[7231]: stats: bits received from HRNG source: 100064
rngd[7231]: stats: bits sent to kernel pool: 40512
rngd[7231]: stats: entropy added to kernel pool: 40512
rngd[7231]: stats: FIPS 140-2 successes: 5
rngd[7231]: stats: FIPS 140-2 failures: 0
rngd[7231]: stats: FIPS 140-2(2001-10-10) Monobit: 0
rngd[7231]: stats: FIPS 140-2(2001-10-10) Poker: 0
rngd[7231]: stats: FIPS 140-2(2001-10-10) Runs: 0
rngd[7231]: stats: FIPS 140-2(2001-10-10) Long run: 0
rngd[7231]: stats: FIPS 140-2(2001-10-10) Continuous run: 0
rngd[7231]: stats: HRNG source speed: (min=824.382; avg=1022.108; max=1126.435)Kibits/s
rngd[7231]: stats: FIPS tests speed: (min=6.459; avg=8.161; max=9.872)Mibits/s
rngd[7231]: stats: Lowest ready-buffers level: 2
rngd[7231]: stats: Entropy starvations: 0
rngd[7231]: stats: Time spent starving for entropy: (min=0; avg=0.000; max=0)us

Source:

Raspberry Pi is a trademark of the Raspberry Pi Foundation.

Installing Raspbian Headless (no screen, full network)

Changelog:

  • 2015-08: initial release
  • 2015-08: add upgrade to Jessie instructions
  • 2018-03: update instructions for Raspbian Stretch.

I’m going to explain how to install Raspbian (latest is based on Debian Stretch, dated 2018-03) on a Raspberry Pi which is only connected to the network using a Ethernet cable (of course your Raspberry Pi should be connected to a power source).

Raspberry Pi 2 Model B+ v1.1This guide should work for all Raspberry Pi supported version with an Ethernet interface (B, B+, 2, 3 and 3-B+). It could potentially work without an Ethernet interface if you have a WiFi USB dongle or a Raspberry Pi with an integrated WiFi which is supported out-of-the box by the RPi. I’ve tested the following on a Raspberry Pi 2 and a Raspberry Pi 3 B+. This guide assumes that you are doing all steps from a Unix machine (I’ve done them from Fedora Linux but it should work on any Linux, BSD or OS X with potential adaptation). It is possible to do it on Windows I suppose, but I don’t have Windows and can’t explain.

The steps are:

  • Flash the Raspbian image to a SD card;
  • Sync everything and mount the second partition created;
  • Modify files on the SD card to allow SSH (and optionally configure WiFi);
  • Put the SD card in your RPi and plug the power;
  • Wait a couple of minute for thing to settle;
  • Either check your DHCP server (e.g. your router) for the RPi IP address, or scan your network);
  • Connect to your RPi using SSH and finish the setup;
  • (option) Upgrade to Debian Jessie (you will have to view the full article)!

Flash the Raspbian image to a SD card

Raspbian LogoThere are already numerous guides online on how to do that. So I will be brief, but refer to those guides for your exact configuration. I assume a new SD card which has already a Windows FAT partition with a size bigger than 4GB (I recommend 16GB). When I plugged that SD card on my laptop it was recognised as /dev/mmcblk0p1 and automatically mounted. First we need to unmount this partition and then to remember the device name (without the partition suffix, so /dev/mmcblk0 in my case). Note that if you are on BSD or OS X those steps are slightly different, check online. Using the device name we can flash the Raspbian image (after downloading the zip file, check that the SHA-256 checksum match, you can either pick-up the normal or the Lite version of Raspbian, but if your goal is a headless server, then the Lite is more suitable).

$ sudo umount /dev/mmcblk0p1
$ unzip -p 2018-03-13-raspbian-stretch-lite.zip | sudo dd bs=4M of=/dev/mmcblk0 oflag=dsync status=progress
$ sync

After doing the above you should have now 2 new partitions on your SD card. The first partition (suffix p1) is the boot one and is formatted as FAT (was <60MB for me). The second one (suffixed p2) is the root partition and is formatted as ext4 (roughly 3GB). That’s the partition /dev/mmcblk0p2 which is interested for the next step.

Allow SSH access

OpenSSH LogoFor pre-systemd Raspbian releases (up to Wheezy, or Debian 7), you need to mount the second partition now, So create first a mount point and then mount the partition to it.

$ sudo mkdir /mnt/rpi
$ sudo mount /dev/mmcblk0p2 /mnt/rpi
$ cd /mnt/rpi/etc
$ sudo mv rc2.d/K01ssh rc2.d/S01ssh
$ sudo mv rc3.d/K01ssh rc3.d/S01ssh
$ sudo mv rc4.d/K01ssh rc4.d/S01ssh
$ sudo mv rc5.d/K01ssh rc5.d/S01ssh

For systemd-based Raspbian (from Jessie or Debian 8), you simply need to have the file ssh (or ssh.txt) created in the “boot” partition which is the 1st partition.

$ sudo mkdir /mnt/rpi
$ sudo mount /dev/mmcblk0p1 /mnt/rpi
$ sudo touch /mnt/rpi/ssh

That’s it!

Optional WiFi configuration

Network Wireless by OxygenOptional: if you do not have an Ethernet interface and need to use WiFi, you need to add the WiFi configuration (your SSID – or WiFi network name – and your WiFi password). Assuming you have something like WPA2-PSK, you simply need to edit the file /mnt/rpi/etc/wpa_supplicant/wpa_supplicant.conf and add the following at the end of the file:

network={
    ssid="Your_WiFi_SSID"
    psk="Your_WiFi_password"
}

The network configuration on Raspbian is set to use DHCP, so after booting the system will use whatever network interface it has available and make DHCP requests in order to get an IP address.

You will also have to specify your country code (in ISO/IEC alpha2 code, DE for Germany, US for USA, JP for Japan, etc.) by either modifying the existing line or by adding it. Here is an example for Iceland:

country=IS

The country code is mandatory (at least on recent Raspbian) in order to have WiFi activated. So you will need to set it up correctly if you want a headless installation using WiFi and no Ethernet.

Note: please don’t use both the Ethernet and WiFi interfaces if you they are both on the same network. Such a configuration is possible, but it won’t work out-of-the-box. So set up first one interface, make it work and then add the other one (look for online resources about how to configure Linux for 2 NIC on the same subnets).

Start Raspbian and connect to it

Now sync all changes to the SD card:

$ cd ~ ; sudo umount /mnt/rpi

Before removing the SD card from your computer, be sure that you properly unmounted it.

Now remove the SD card from the computer, insert it in the Raspberry Pi, plug the Ethernet cable (or the WiFi USB dongle) and then the USB power plug. The LEDs of your RPi should light up (PWR – red one – means that your power supply is good enough; ACT – green one – should not be steady green, it means your SD card is not readable or was wrongly flashed, it should blink). After the RPi has completed boot up, the ACT LED should be off (mostly), meaning that there are no more I/O activities going on. That’s when you can be sure that the RPi has sent its DHCP probes and should have an IP address assigned.

If you have a proper router which register a DNS entry for each DHCP clients, you should be able to directly login to your Raspberry Pi by doing:

$ ssh pi@raspberrypi

If you router does not support such feature, you will need to know your Raspberry Pi IP address, you can either go to your DHCP server (e.g. your router) and check which address was assigned to it, or simply scan your network. To scan your network you need to know your subnet (e.g. 192.168.1.0 with a netmask of 255.255.255.0) and have nmap installed on your computer (sudo dnf install nmap will work for Fedora, and it is as easy for Debian/Ubuntu-based distros as well, just replace dnf by apt-get).

$ sudo nmap -sP 192.168.1.0/24

Of course you need to adapt the above command to your subnet. The “/24” part is the netmask equivalent of 255.255.255.0. I recommend running the above command with sudo because it will display the MAC address of all the discovered devices which will help you spot your Raspberry Pi as nmap is displaying the vendor attached to each MAC address. See for yourself in the example output:

Starting Nmap 6.47 ( http://nmap.org ) at 2015-07-19 20:12 CEST
(...)
Nmap scan report for raspberrypi.lan (192.168.1.9)
Host is up (0.0060s latency).
MAC Address: B8:27:EB:1E:42:18 (Raspberry Pi Foundation)
(...)
Nmap done: 256 IP addresses (8 hosts up) scanned in 2.05 seconds

Now you can simply connect to your RPi by using the user pi and password raspberrypi (which are default on Raspbian):

$ ssh pi@192.168.1.9
The authenticity of host 'raspberrypi (192.168.1.9)' can't be established.
ECDSA key fingerprint is SHA256:WSF9Rpmh0Mr/JYUye8r69nXzwZtYbdH0xJ5M4AFYxYY.
Are you sure you want to continue connecting (yes/no)? yes
Warning: Permanently added 'raspberrypi,192.168.1.9' (ECDSA) to the list of known hosts.
pi@raspberrypi's password: 
Linux raspberrypi 4.9.80-v7+ #1098 SMP Fri Mar 9 19:11:42 GMT 2018 armv7l

The programs included with the Debian GNU/Linux system are free software;
the exact distribution terms for each program are described in the
individual files in /usr/share/doc/*/copyright.

Debian GNU/Linux comes with ABSOLUTELY NO WARRANTY, to the extent
permitted by applicable law.

NOTICE: the software on this Raspberry Pi has not been fully configured. Please run 'sudo raspi-config'

pi@raspberrypi ~ $

It was advised, that you run the command sudo raspi-config especially to increase the partition size so it uses the complete SD card space available. This step is however done automatically for you on recent Raspbian.

However, you should really do one extra step: change the default pi password or create a specific account for you. You can use the command passwd to change the password on the command line.

That’s it, you have installed Raspbian on a Raspberry Pi without a screen or keyboard (headless). I strongly recommend to follow my advice about Raspberry Pi Raspbian post-installation and security.

Picture credits: The Debian Logo belongs to the Debian project. Raspberry Pi and its logo are trademarks of the Raspberry Pi Foundation. The OpenSSH logo is copyrighted by OpenBSD. The wireless device is an icon from the Oxygen set of the KDE project provided under GNU LGPLv3.


Update: I forgot the icing on the cake: upgrading to Debian Jessie. Continue reading to learn a quick way to do it.

Continue reading “Installing Raspbian Headless (no screen, full network)”

Internet of Things? Not as it is marketed

Prototype of an IoT project based on ArduinoAs I’m trying to prototype some sensors which I will then use around my home to monitor events and perhaps also react on them, I’ve been a bit more looking at the Internet of Things (aka IoT) trend. So here is my opinion on IoT in regards to personal home automation.

And to start franckly, I think the use of IoT for home automation is idiotic. It is my view that current companies in this field understood IoT as being online, in the cloud, whereas I thought it was about to be based on network standards (such as those used on the internet) for improved interoperability. Why is it needed to make it “internet” connected (collected)? It really does not need to be on the internet, IoT just needs the local network access and standard communication stack!

I think the monitoring elements, the storage of this data, the analysis and control systems, and the actuators should all be local, in house. If an actuator needs data from the Internet or in the end calling an internet service it’s still possible even if it stays local. There is absolutely no advantage to have all this in a “cloud”, this is only to the benefits of ad agency and other agencies which can use your data to better “monitor” you!

And having an IoT brings many challenges: data transmission, congestion, storage, latency, security, privacy, etc. some of those are mentioned in this article I found on Twitter today. But this article is also oriented towards other usage for IoT than in the house. (Note that if you’re used to build M&C – Monitoring and Control – systems, you will not be surprised by this article content, these are classical challenges in M&C domain).

From my perspective and when used within a house, my decentralized approach to IoT (without cloud or external internet services) is not subject (to the same extent) to most of the challenges presented in this article.

I also think that data retention for a house is really limited (e.g. only the latest status for a window/door open state sensor; maybe up to a week/month of data from a temperature sensor; etc.) so storage of data is not challenging.

Latency is also not such a problem. Only few actuators in a home would require immediate response (e.g. so called “smart lock”). For other sensors the reporting of new data could be cyclic (with long update cycles such as once every 15 minutes) or on change (with big thresholds) because latency is of such lower priority.

Raspberry Pi 2 box with Logo (a raspberry)I therefore think a device as simple as a Raspberry Pi 2 is perfectly suited to be the core element of a Home Automation system. It has enough processing power, storage capacity, interfaces capabilities to be the host of all the gathering of monitored data, their processing and analysis, and of all actuators. And it can easily use internet services (if need be) thanks to its network interface.

If one day I find the need to have access to my home automation system, it will be simply done from my mobile via VPN or router configuration.

As a conclusion you can find consolidated here my opinion regarding IoT and Home Automation:

  • On premise: the data should not leave the house, processing and controlling should be done at home;
  • No Cloud: this is the corollary to my previous point. The data belong to us and shall be kept private. Pushing them to the cloud add complexity, risks with no benefits;
  • Open standards: communication and interoperability are paramount for the success of IoT. Adding a new IoT device should be easy; and
  • Short data lifespan: no need to keep tracks of IoT data for long periods. Most of it is interesting only the moment it changes and then can be forgotten.

The Best Companion to my Raspberry Pi

I got recently a companion for my Raspberry Pi.

A photo of a Arduino Uno R3
An Arduino Uno R3 – The 1 € coin is given for size comparison.

My goal is to use it to prototype something I want to make: a small network of temperature and humidity sensors running for months on batteries.

Why? First because I can (I need to learn a lot first regarding electronic or microcontrollers, but I’m sure I can). Second because we have add a few problems with humidity in our basement and I want to be able to have a better idea when this is happening to find a proper solution. My idea would be to correlate the measurements to others done externally and which would include more environmental data (e.g. pressure and amount of rain) and if possible with some events (e.g. gutters are overflowing water).

I already started the prototyping based on a tutorial from Adafruit – a Wifi Weather Station. The results works well as one could expect. So I validated my first part: yes I can do some basic electronic and microcontroller programming, the Raspberry Pi is doing the web server side.

My Prototype Environmental Sensor (WiFi based) v0.1

A Simple Monitoring Web App (from Adafruit tutorial)

The next step is reprogramming the microcontroller to push data periodically using plain UDP and either a Graphite, Statsd or Fluentd syntax. This would be pushed to a multicast address which my Raspberry Pi would listen to, it would run the Graphite/Statsd/Fluentd stack (I’m going to start with Graphite alone and see how good it is). I want to keep historical data of at least one month, perhaps even a bit more and to be able to visualise the data in real time.

Once this is done, then I want to get rid of the WiFi module and use a transceiver in the 433 or 868 MHz band (I’m in Europe). The Raspberry Pi will be the gateway between this radio-protocol and the more standard computer network stack. So I would need to adapt whatever I had chosen for stack on my Raspberry Pi to be able to cope with the new type of input. Either I contribute to a project if it is well architectured, or I build a bridge interface.

Final step of the prototyping will be to go low power. I’ve already approximately calculated how long I could run on 2 AA rechargeable batteries with the latest Arduino prototype and my “guestimates” is that it won’t last more than a week (probably less). So far from ideal. The solution is to build your own “Arduino”, meaning taking the microcontroller only (plus a few required components for it to run) and the needed components for the sensor. It seems that the power draw from the battery in this case would be sub mA. So I should be able to run many months on a 2 AA batteries :-)